图像的基本操作
在GDI+中,对图像的处理主要靠两个类,Image类和Bitmap类,Bitmap类是在Image类的基础上派生出来的。这里主要讲Image类的使用,Image类支持对BMP, GIF, JPEG, PNG, TIFF, 和 EMF,尤其注意,在PNG图像中,包含ALPHA通道,所以能实现不规则图像;一、图像的打开与显示
图像打开 我们在前言部分已经讲到,在GDI+中,对图像的处理主要靠两个类,Image类和Bitmap类,在Image类的构造函数中,可以直接加载图片供开发者使用,其加载方式为:
Image(filename, useEmbeddedColorManagement)
Image(stream, useEmbeddedColorManagement) ;//这个不讲了,在一般不用,只在剪切保存图片时有用
参数说明: filename:[in]文件名,(可以是绝对地址,也可以是相对地址) useEmbeddedColorManament:[in]是否使用在保存在图片中的色彩校正信息(如ICM、Gamma较正),该参数默认值为FALSE; 显示图片
对于图像文件的显示,GDI+主要使用DrawImage函数来完成。DrawImage函数是GDI+功能最强大、调用方式最为灵活的函数中的一种。能够实现在GDI中使用BitBlt函数不能实现的功能(如图片的任意角度旋转、倒置及插值运算),看下DrawImage的形式:
DrawImage(Image* image, Point* destPoints, INT count)
DrawImage(Image* image, PointF* destPoints, INT count)
DrawImage(Image* image, Point* destPoints, INT count, INT srcx, INT srcy, INT srcwidth, INT srcheight, Unit srcUnit, ImageAttributes* imageAttributes, DrawImageAbort callback, VOID* callbackData)
DrawImage(Image* image, PointF* destPoints, INT count, REAL srcx, REAL srcy, REAL srcwidth, REAL srcheight, Unit srcUnit, ImageAttributes* imageAttributes, DrawImageAbort callback, VOID* callbackData)
DrawImage(Image* image, Rect& destRect, INT srcx, INT srcy, INT srcwidth, INT srcheight, Unit srcUnit, ImageAttributes* imageAttributes, DrawImageAbort callback, VOID* callbackData)
DrawImage(Image* image, RectF& destRect, REAL srcx, REAL srcy, REAL srcwidth, REAL srcheight, Unit srcUnit, ImageAttributes* imageAttributes, DrawImageAbort callback, VOID* callbackData)
DrawImage(Image* image, Point& point)
DrawImage(Image* image, PointF& point)
DrawImage(Image* image, Rect& rect)
DrawImage(Image* image, RectF& rect)
DrawImage(Image* image, INT x, INT y)
DrawImage(Image* image, REAL x, REAL y)
DrawImage(Image* image, INT x, INT y, INT srcx, INT srcy, INT srcwidth, INT srcheight, Unit srcUnit)
DrawImage(Image* image, REAL x, REAL y, REAL srcx, REAL srcy, REAL srcwidth, REAL srcheight, Unit srcUnit)
DrawImage(Image* image, INT x, INT y, INT width, INT height)
DrawImage(Image* image, REAL x, REAL y, REAL width, REAL height)
呃,上面的重载形式太多了,看得眼花缭乱,不过都是一种重载形式,由于变量的不同所以会出现两个重载函数,把相同的给咔嚓掉,最后实际就是下面几种:
DrawImage(Image* image, PointF* destPoints, INT count)
DrawImage(Image* image, PointF* destPoints, INT count, REAL srcx, REAL srcy, REAL srcwidth, REAL srcheight, Unit srcUnit, ImageAttributes* imageAttributes, DrawImageAbort callback, VOID* callbackData)
DrawImage(Image* image, Rect& destRect, INT srcx, INT srcy, INT srcwidth, INT srcheight, Unit srcUnit, ImageAttributes* imageAttributes, DrawImageAbort callback, VOID* callbackData)
DrawImage(Image* image, PointF& point)
DrawImage(Image* image, RectF& rect)
DrawImage(Image* image, INT x, INT y)
DrawImage(Image* image, INT x, INT y, INT srcx, INT srcy, INT srcwidth, INT srcheight, Unit srcUnit)
DrawImage(Image* image, INT x, INT y, INT width, INT height)
其它先不看,我们看一种最难的形式:
DrawImage(Image* image, Rect& destRect, INT srcx, INT srcy, INT srcwidth, INT srcheight, Unit srcUnit, ImageAttributes* imageAttributes, DrawImageAbort callback, VOID* callbackData)
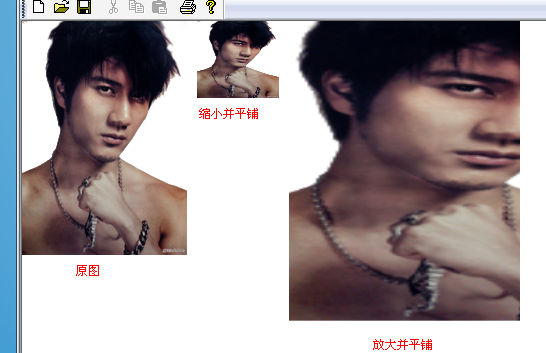
参数说明: image:[in]图像文件对象; destRect:[in]目标显示区域 srcx:[in]要截取的目标位置,在原图中的X点坐标 srcy:[in]要截取的目标位置,在原图中的Y坐标 srcwidth:[in]要截取的目标图像的宽度 srcheight:[in]要截取的目标图像的高度 注意:由于是截取一块图像作为显示图像在目标区域中显示,所以这就出现了问题 1、当截取的图像比目标区域小呢? 这时,就是将截取的图像拉伸,以至完全填充到目标区域 2、当截取的图像比目标区域大呢? 这里,就会将截取的图像缩小并平铺到目标区域中,并不会截取一部分显示
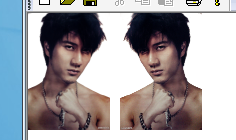
看示例:(放大、缩小)
Image image(L"wlh.bmp");
UINT width=image.GetWidth();
UINT height=image.GetHeight();
//原图显示
graphics.DrawImage(&image,RectF(0,0,width,height));
//缩小并平铺
graphics.TranslateTransform(width+10,0);
graphics.DrawImage(&image,RectF(0,0,width/2,height/2-40));
//放大并平铺,将在原图指定区域截取的图像,填充到目标区域中,填充时采用了缩放模式
graphics.TranslateTransform(width/2+10,0);
RectF destinationRect(0,0,1.4*width,1.4*height);
graphics.DrawImage(&image,destinationRect,20,20,width/2,height,UnitPixel);
首先考虑两个问题: 1、在拉伸图像时,假设图像会被拉大好几倍,如何用原来的那些像素点来填充拉大后的图像,就出现了问题,比如,原来一个像素点,在拉大图像后,这个像素点周围会变得空白,如何运用算法填充这些空白呢? 2、在缩小图像时,同样假设图像缩小为原来的1/5,那么就说明在原图像中,每5个像素,会被整合成一个像素,那这些像素怎么整合呢?哪种整合方法更好一点呢? 以上这两上放、大缩小时,如何填充被放大的空间,如何整合缩小的像素,这些问题,这就是插补模式要考虑的问题,插补模式又称为“插值模式”,是指如何计算两个终点之间的中间值。也就是定义了很多种算法,这些算法的效果决定了缩放后图像的质量。 GDI+中使用Graphics类的SetInterpolationMode(设置插值模式)函数来指定插补算法。看下函数定义:
Status SetInterpolationMode( InterpolationMode interpolationMode );其中InterpolationMode是个枚举类,枚举了几种插补模式,定义如下:
enum InterpolationMode{
InterpolationModeInvalid = QualityModeInvalid,//插值无效
InterpolationModeDefault = QualityModeDefault,//默认模式
InterpolationModeLowQuality = QualityModeLow,//低质量插值法
InterpolationModeHighQuality = QualityModeHigh,//高质量插值法
InterpolationModeBilinear,//双线性插值法
InterpolationModeBicubic,//双三次插值法
InterpolationModeNearestNeighbor,//最临近插值法
InterpolationModeHighQualityBilinear,//高质量双线性插值法
InterpolationModeHighQualityBicubic//高质量双三次插值法
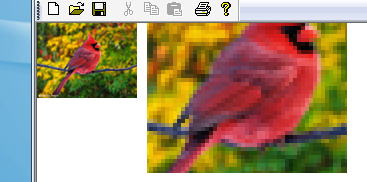
}; 看下面这个图片,显示了将一个图像使用不同的插值算法放大两倍后的结果:
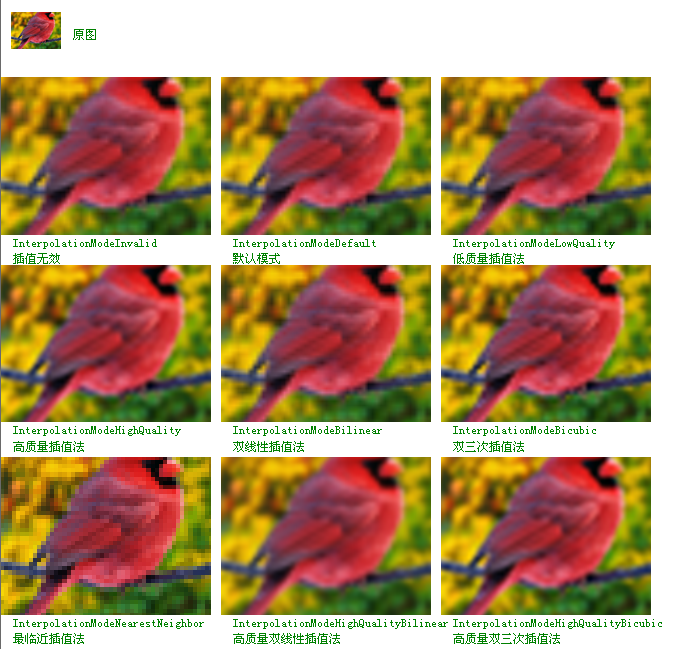
Image image(L"bird.bmp");
UINT width=image.GetWidth();
UINT height=image.GetHeight();
Matrix matrix;
graphics.GetTransform(&matrix);
graphics.DrawImage(&image,RectF(0,0,width,height));
graphics.TranslateTransform(width+10,0);
RectF destinationRect(0,0,2*width,2*height);
graphics.SetInterpolationMode(InterpolationModeNearestNeighbor);
graphics.DrawImage(&image,destinationRect,20,20,width/2,height/2,UnitPixel);
三、图像操作
图片的简单旋转
利用Bitmap或Image对象的RotateFilip函数就可以实现图像的旋转和翻转了。该函数的调用方法为:
Status RotateFlip( RotateFlipType rotateFlipType );其中RotateFlipType是一个枚举类,枚举了8种旋转方式,看下定义:
enum RotateFlipType{
  RotateNoneFlipNone = 0,//不旋转不翻转
  Rotate90FlipNone = 1,//旋转90度不翻转
  Rotate180FlipNone = 2,//旋转180度不翻转
  Rotate270FlipNone = 3,//旋转270度不翻转
  RotateNoneFlipX = 4,//不旋转水平翻转
  Rotate90FlipX = 5,//旋转90度水平翻转
  Rotate180FlipX = 6,//旋转180度水平翻转
  Rotate270FlipX = 7,//旋转270度水平翻转
  RotateNoneFlipY = Rotate180FlipX,//往下的这些跟上面的效果都是一样的,所以一般都不用下面的几个
  Rotate90FlipY = Rotate270FlipX,
  Rotate180FlipY = RotateNoneFlipX,
  Rotate270FlipY = Rotate90FlipX,
  RotateNoneFlipXY = Rotate180FlipNone,
  Rotate90FlipXY = Rotate270FlipNone,
  Rotate180FlipXY = RotateNoneFlipNone,
  Rotate270FlipXY = Rotate90FlipNone
};
看下效果:
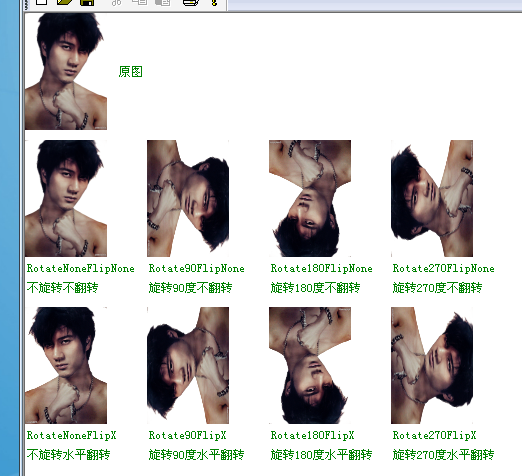
Image image(L"bird.bmp");
UINT width=image.GetWidth();
UINT height=image.GetHeight();
Matrix matrix;
graphics.GetTransform(&matrix);
graphics.DrawImage(&image,RectF(0,0,width/2,height/2));
graphics.SetTransform(&matrix);
graphics.TranslateTransform(width/2+10,0);
Image *img2=image.Clone();
img2->RotateFlip(RotateNoneFlipX);
graphics.DrawImage(img2,RectF(0,0,width/2,height/2));
GDI+中可以定制缩略图,具体办法是使用Image类的GetThumbnailImage来实现,该函数的调用方法为:
Image* GetThumbnailImage(
  UINT thumbWidth,
  UINT thumbHeight,
  GetThumbnailImageAbort callback,
  VOID* callbackData
);
参数说明: thumbWidh、thumbHeightt:[in]指明需要建立的缩略图宽度和高度,在IMG中不会自动保持宽高比,会根据指定的高度和宽度完全填充; callback、callbackData:[in]建立缩略图时要用到的回调函数及回调函数中数据的存放地址;在GDI+1.0版中不能使用此功能;注意XP中使用也是1.0版 注意:这里虽是指获取缩略图,但当所指区域比原图大时,就会把原图放大,与DrawImage指定目标区域,没什么区别;
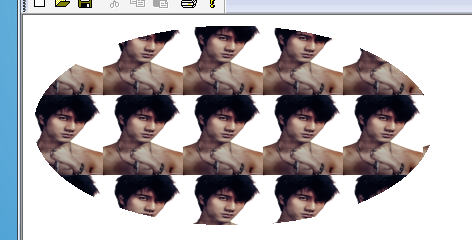
示例:
graphics.SetInterpolationMode(InterpolationModeHighQualityBicubic);
Image img(L"wlh.bmp");
float shear=img.GetHeight()/img.GetWidth();//获取高/宽比,以至缩放时不变形
Image *pThumbnail=img.GetThumbnailImage(80,80*shear,NULL,NULL);//高度乘以高宽比
TextureBrush picBrush(pThumbnail);
graphics.FillEllipse(&picBrush,RectF(10,10,400,200));
克隆复制是GDI+中的新概念,对图片克隆的范围可以是整体,也可以是局部的。实现克隆的办法是使用Bitmap类/Image类的Clone成员函数;需要注意的是,Bitmap类可以实现局部克隆和整体克隆,而Image类只能整体克隆; 我们看下Bitmap类的Clone函数:
Clone()
Clone(Rect& rect, PixelFormat format)
Clone(RectF& rect, PixelFormat format)
Clone(INT x, INT y, INT width, INT height, PixelFormat format)
Clone(REAL x, REAL y, REAL width, REAL, height, PixelFormat format)
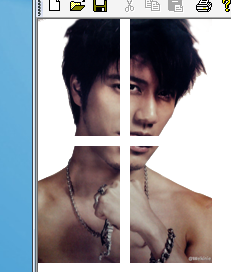
参数说明: rect:[in]要克隆的区域,指在原图中的坐标区域矩形; x,y:[in]要克隆区域的X,Y坐标; width,height:[in]要克隆区域的宽度和高度; 看下示例(将图片通过克隆,分成四块):
Bitmap bmp(L"wlh.bmp");
INT height=bmp.GetHeight();
INT width=bmp.GetWidth();
RectF dest[4];
dest[0]=RectF(0,0,width/2,height/2);
dest[1]=RectF(width/2,0,width/2,height/2);
dest[2]=RectF(0,height/2,width/2,height/2);
dest[3]=RectF(width/2,height/2,width/2,height/2);
//把原图像分为分四块克隆
Bitmap *s[4];
s[0]=bmp.Clone(dest[0],PixelFormatDontCare);
s[1]=bmp.Clone(dest[1],PixelFormatDontCare);
s[2]=bmp.Clone(dest[2],PixelFormatDontCare);
s[3]=bmp.Clone(dest[3],PixelFormatDontCare);
//绘图
graphics.DrawImage(s[0],RectF(0,0,width/2,height/2));
graphics.DrawImage(s[1],RectF(width/2+10,0,width/2,height/2));
graphics.DrawImage(s[2],RectF(0,height/2+10,width/2,height/2));
graphics.DrawImage(s[3],RectF(width/2+10,height/2+10,width/2,height/2));
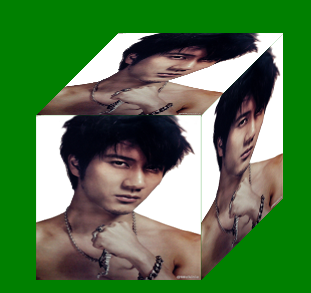
Status DrawImage(
  Image* image,
  const Point* destPoints,
  INT count
);
参数说明: image:[in]图像对象 destPoints:[in]目标区域的点的组合,这里只包含三个点,左上,右上,左下,对于第四个点的坐标,GDI+会根据平行四边形原理自动计算位置; count:[in]destPoints数组里的点的个数,必须等于3 示例:(实现上面的三面立方体)
//清空原背景色,然后将背景色换为绿色
graphics.Clear(Color::Green);
//设置填充模式
graphics.SetInterpolationMode(InterpolationModeHighQualityBicubic);
Image img(L"wlh.bmp");
INT left=100;
INT top=200;
INT width=img.GetWidth();
INT height=img.GetHeight();
//正面
PointF desFace[]={
	PointF(left,top),
	PointF(left+width,top),
	PointF(left,top+width),
};
graphics.DrawImage(&img,desFace,3);
//上面投射
PointF destTop[]={
	PointF(left+width/2,top-width/2),
	PointF(left+width/2+width,top-width/2),
	PointF(left,top),
};
graphics.DrawImage(&img,destTop,3);
//侧面投射
PointF desRight[]={
	PointF(left+width,top),
	PointF(left+width/2+width,top-width/2),
	PointF(left+width,top+width)
};
graphics.DrawImage(&img,desRight,3); 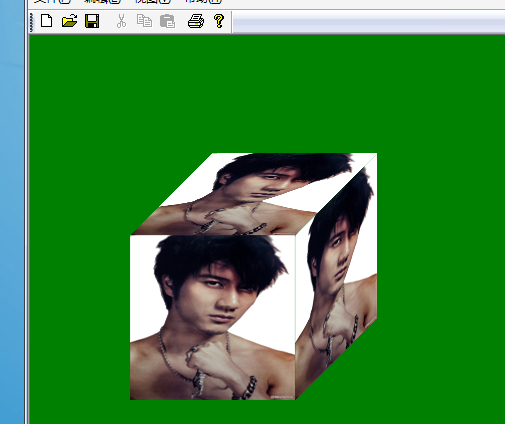
调整图像的色彩信息
色彩调整,主要靠ImageAttributes类中的函数来操作的,所以这里也就是对ImageAttributes类中各函数功能的讲解;这里说色彩较正,其实就是通过色彩变换矩阵,对色彩所进行的操作。 一、启用与禁用色彩校正使用色彩变换矩阵,程序开发人员可以使用ImageAttributes对象修改在绘图平面上的图片输出行为:使用修改后的色彩对应关系。在修改过程中,可以临时禁用或启用色彩校正行为。ImageAttributes类的成员函数SetNoOp和ClearNoOp实现了对色彩校正的临时关闭与启用,其函数调用格式为:
Status SetNoOp(
			   ColorAdjustType type
			   );
Status ClearNoOp(
				 ColorAdjustType type
				 );
其中,ColorAdjustType是个枚举类,指明了几种色彩调整对象;
enum ColorAdjustType{
  ColorAdjustTypeDefault,//匹配全部对象
  ColorAdjustTypeBitmap,//仅匹配图像,虽然这里用的是Bitmap,但不仅限于BMP图像,只要是图像都用这个
  ColorAdjustTypeBrush,//仅匹配画刷
  ColorAdjustTypePen,//仅匹配画笔
  ColorAdjustTypeText,//仅匹配对文字的调整
  ColorAdjustTypeCount,//不用
  ColorAdjustTypeAny//不用,最后两个是不用的;
};
上代码,看示例:
Image img(L"wlh.bmp");
int width=img.GetWidth();
int height=img.GetHeight();
//原图
graphics.DrawImage(&img,RectF(0,0,width,height));
//应用色彩变换
graphics.TranslateTransform(width+10,0);
ColorMatrix colorMatrix={
	0.0f,1.0f,0.0f,0.0f,0.0f,
	0.0f,1.0f,0.0f,0.0f,0.0f,
	0.0f,0.0f,1.0f,0.0f,0.0f,
	0.0f,0.0f,0.0f,1.0f,0.0f,
	0.0f,0.0f,0.0f,0.0f,1.0f
};
ImageAttributes imgattr;
imgattr.SetColorMatrix(&colorMatrix,ColorMatrixFlagsDefault,ColorAdjustTypeBitmap);
graphics.DrawImage(&img,RectF(0,0,img.GetWidth(),img.GetHeight()),0,0,img.GetWidth(),img.GetHeight(),UnitPixel,&imgattr);
//清除对图像的变换
imgattr.SetNoOp(ColorAdjustTypeBitmap);
graphics.TranslateTransform(width+10,0);
graphics.DrawImage(&img,RectF(0,0,img.GetWidth(),img.GetHeight()),0,0,img.GetWidth(),img.GetHeight(),UnitPixel,&imgattr);
//清除刚才的清除操作
imgattr.ClearNoOp(ColorAdjustTypeBitmap);
graphics.TranslateTransform(width+10,0);
graphics.DrawImage(&img,RectF(0,0,img.GetWidth(),img.GetHeight()),0,0,img.GetWidth(),img.GetHeight(),UnitPixel,&imgattr); 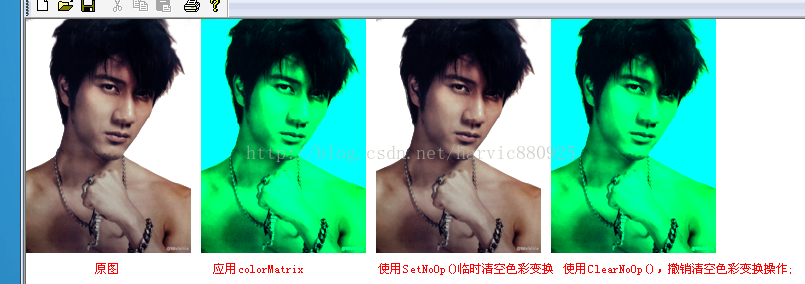
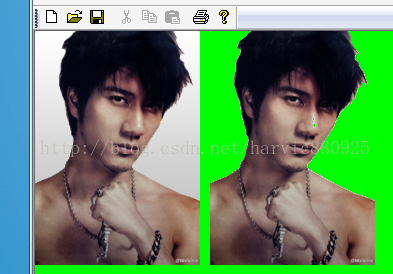
Status SetColorKey(
  const Color& colorLow,
  const Color& colorHigh,
  ColorAdjustType type
);
参数说明: colorLow:[in]透明色的最低值; colorHigh:[in]透明色的最高值; type:[in]指定要设定关键色的对象; 注意:假设colorLow设定为Color(100, 95, 30),colorHigh设定为:Color(250, 245, 60);那么对于颜色值Color(x,y,z);如果100
收藏的用户(0) X
正在加载信息~
推荐阅读
最新回复 (0)
站点信息
- 文章2313
- 用户1336
- 访客11756491
每日一句
Life is short; Live it!
人生苦短,活出精彩。
人生苦短,活出精彩。
 信鸽推送报错NSObject checkTargetOtherLinkFlagForObjc
 简单利用Clover四叶草安装U盘安装黑苹果
 学习使用Java注解
 OllyDbg中如何找出B模块中所有调用了A模块的C方法的地方
 解决SSH客户端中文乱码
 10年后,Android应用程序仍然比iOS应用程序差
 C++11特性里面的thread
 XPosed微信自动生成二维码
 解决android studio "found an invalid color"的问题
 T9社区注册方法【勼适様鲃女尔懟死】
 Thinkpad x1 Extreme黑苹果10.14.5安装完成
 基于大白主题增加图片本地化的功能
 Linux系统查看CPU使用率的几个命令
新会员