1.通用规则
多数库是不需要预先编译的,include hpp文件就能用。如果出现链接失败,那就是可能需要编译库了。
boost自带一套编译工具bjam,bjam本身是跨平台的,并且也要自行编译出来。在boost目录下有bootstrap.sh和bootstrap.bat两个脚本分别用来编译*nix和windows下的bjam。bootstrap脚本可以传入参数,以在编译bjam过程中生成特定的编译boost的配置。这些配置保存在新生成的project-config.jam里,但还可以在运行bjam的时候再传入参数来覆盖。同时生成的b2是bjam的代理,运行哪个的效果都差不多。 在终端下运行 bjam --show-libraries 会列出所有要编译的库。 真正编译时,可以传入–with-xxx来选择编译哪些库,或者传入–without-xxx来选择不编译哪些库。如果不传则会读取project-config.jam的设置,如果也没有则是编译全部的库。 更多的参数可以用 bjam --help 来查看。例如编译成静态库还是动态库,运行时库是静态的还是动态的,编译完后要不要安装等。
注意:旧版本的boost可能会存在编译问题,尽量用新的就好。bjam在*nix和windows支持的参数有不同。
2. iOS平台编译
环境:
OS X Yosemite 10.10.3 Xcode 6.3.1(6D1002)。如果用Xcode 7在模拟器版链接失败,请参考评论区4楼里的解决方案!boost 1.57/1.58
步骤:
把下面的脚本保存成build_boost.sh,直接运行即可:
#!/bin/bash
# http://blog.csdn.net/hursing/article/details/45439087
# 请自行修改路径,cd到boost解压后的目录下
dir=`dirname $0`
cd "$dir/../../third_party/boost_1_57_0"
# 如果库文件已存在,直接退出
if [ -e ./stage/lib/libboost_date_time.a ]; then
  echo "libraries exist. no need to build."
  exit 0
fi
# 以下代码参考 https://gist.github.com/rsobik/7513324 ,原文使用的boost版本比较旧,不能使用。
: ${COMPILER:="clang++"}
: ${IPHONE_SDKVERSION:=`xcodebuild -showsdks | grep iphoneos | egrep "[[:digit:]]+\.[[:digit:]]+" -o | tail -1`}
: ${XCODE_ROOT:=`xcode-select -print-path`}
: ${EXTRA_CPPFLAGS:="-DBOOST_AC_USE_PTHREADS -DBOOST_SP_USE_PTHREADS -stdlib=libc++"}
echo "IPHONE_SDKVERSION: $IPHONE_SDKVERSION"
echo "XCODE_ROOT:        $XCODE_ROOT"
echo "COMPILER:          $COMPILER"
echo "bootstrap"
# 此脚本如果是被Xcode调用的话,会因为xcode export的某些变量导致失败,所以加了env -i。直接在命令行运行此脚本可以把env -i 去掉
env -i bash ./bootstrap.sh
echo "write project-config.jam"
# 默认生存的project-config.jam是编译Mac版的,这里直接调换掉
rm project-config.jam
cat >> project-config.jam <<EOF
using darwin : ${IPHONE_SDKVERSION}~iphone
: $XCODE_ROOT/Toolchains/XcodeDefault.xctoolchain/usr/bin/$COMPILER -arch armv7 -arch arm64 $EXTRA_CPPFLAGS
:$XCODE_ROOT/Platforms/iPhoneOS.platform/Developer
:armiphone
;
using darwin : ${IPHONE_SDKVERSION}~iphonesim
: $XCODE_ROOT/Toolchains/XcodeDefault.xctoolchain/usr/bin/$COMPILER -arch i386 -arch x86_64 $EXTRA_CPPFLAGS
:$XCODE_ROOT/Platforms/iPhoneSimulator.platform/Developer
:ia64iphone
;
EOF
# 上面的代码里,两个using darwin分别是编译真机版和模拟器版的设置。每多一种CPU架构就要再加一个-arch xxx。
echo "build boost iphone dev"
./bjam -j16 --with-date_time --with-filesystem --with-system --with-thread --build-dir=iphone-build --stagedir=iphone-build/stage toolset=darwin architecture=arm target-os=iphone macosx-version=iphone-${IPHONE_SDKVERSION} define=_LITTLE_ENDIAN link=static stage
echo "build boost iphone sim"
./bjam -j16 --with-date_time --with-filesystem --with-system --with-thread --build-dir=iphonesim-build --stagedir=iphonesim-build/stage --toolset=darwin-${IPHONE_SDKVERSION}~iphonesim architecture=ia64 target-os=iphone macosx-version=iphonesim-${IPHONE_SDKVERSION} link=static stage
echo "lipo"
# 把各架构下的库文件合一,以便在xcode里可以少设置些搜索路径。做得更彻底些是各个分库合成一个大库。不过除非是把静态库加入到代码仓库,否则是浪费时间了。要合成的大库话请参考https://gist.github.com/rsobik/7513324原文。
mkdir -p stage/lib
lipo -create iphone-build/stage/lib/libboost_date_time.a iphonesim-build/stage/lib/libboost_date_time.a -output stage/lib/libboost_date_time.a
lipo -create iphone-build/stage/lib/libboost_filesystem.a iphonesim-build/stage/lib/libboost_filesystem.a -output stage/lib/libboost_filesystem.a
lipo -create iphone-build/stage/lib/libboost_system.a iphonesim-build/stage/lib/libboost_system.a -output stage/lib/libboost_system.a
lipo -create iphone-build/stage/lib/libboost_thread.a iphonesim-build/stage/lib/libboost_thread.a -output stage/lib/libboost_thread.a
# 库文件最终放在./stage/lib/下
echo "Completed successfully"
集成到Xcode
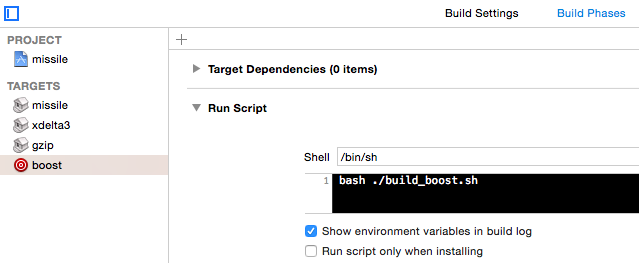
做iOS的同学还是习惯完全用Xcode的吧。所以可以把上面的脚本集成到xcode里。在某个工程中,Xcode菜单File->New->Target…->Other->Aggregate->取名boost,Finish->在这个target的属性中选择Build Phases->点击左边的+号->New Run Script Phase->填入bash ./build_boost.sh->自己再填好库文件搜索路径和链接各个boost库。主target还要设置依赖boost target,免得boost编译前就链接以致错误。
3.Android平台编译
Android的编译方法有两种:一种是和iOS一样,自己覆盖project-config.jam引入NDK的编译工具设置,然后用bjam编译;另一种是自己写Android.mk。自己写project-config.jam因为要兼顾很多种CPU架构而(无论是写jam还是主工程的Android.mk都)较为麻烦,所以本文用后者。
环境
Ubuntu 14.04 64bit / Linux Mint 17 64bit NDK r10c boost 1.57/1.58
步骤
想要哪个库,自己把那个库下的cpp文件加到mk里,都在libs/xxxx/下。如果在libs找不到,说明这个库是不需要额外编译的。 以下是编译四个库的Android.mk的内容:
include $(CLEAR_VARS)
LOCAL_PATH := $(ROOT_PATH)/third_party/boost_1_57_0
LOCAL_MODULE := boost
# 需要编译哪个库,自行把libs目录下的cpp加进来即可。
LOCAL_SRC_FILES += \
  libs/filesystem/src/path.cpp \
  libs/filesystem/src/path_traits.cpp \
  libs/filesystem/src/operations.cpp \
  libs/filesystem/src/codecvt_error_category.cpp \
  libs/filesystem/src/portability.cpp \
  libs/filesystem/src/utf8_codecvt_facet.cpp \
  \
  libs/date_time/src/gregorian/date_generators.cpp \
  libs/date_time/src/gregorian/greg_month.cpp \
  libs/date_time/src/gregorian/greg_weekday.cpp \
  libs/date_time/src/gregorian/gregorian_types.cpp \
  libs/date_time/src/posix_time/posix_time_types.cpp \
  \
  libs/system/src/error_code.cpp \
  \
  libs/thread/src/future.cpp \
  libs/thread/src/pthread/once.cpp \
  libs/thread/src/pthread/once_atomic.cpp \
  libs/thread/src/pthread/thread.cpp
# 如果要把boost集成到动态库里,-fPIC是必须的,不然会有链接错误。原因请自行Google
LOCAL_CFLAGS += -fPIC -frtti -fexceptions
include $(BUILD_STATIC_LIBRARY)
Application.mk的内容:
APP_PLATFORM := android-19
APP_OPTIM := release
APP_CFLAGS += -Wall
APP_STL := gnustl_static
APP_ABI := armeabi-v7a
这是最普通的做法,如果要加编译参数,还得自己琢磨下。例如不要rtti,就得LOCAL_CFLAGS += -DBOOST_NO_RTTI。
还是想用boost原生的编译方法的话,可参考这里 http://stackoverflow.com/questions/30491158/compile-and-use-boost-for-android-ndk-r10e
4.Windows平台编译
环境
Windows 7 旗舰版 64bit SP1 Visual Studio Ultimate 2013 boost 1.57/1.58
步骤
以下是build_boost.bat的内容,直接执行即可:
cd ..\..\third_party\boost_1_57_0
if not exist .\b2.exe (
    call .\bootstrap.bat
    .\b2.exe -j5 --with-date_time --with-filesystem --with-system --with-thread --with-regex link=static runtime-link=static
)
注意这里生成的是MTd和MT。MD的话runtime-link=shared。
集成到VS
工程属性->Configuration Properties->Build Events->Pre-Link Event->Command Line->填入build_boost.bat 还有设置好库搜索路径和依赖的库。 Windows的boost有个特点,代码里有#pragma comment(lib, "xxxx"),所以可以不设置依赖的库。但是如果工程设置不对而有link错误,那还是手动加进去吧。
5.Linux平台编译
环境
Ubuntu 14.04 64bit / Linux Mint 17 64bit gcc version 4.8.2 (Ubuntu 4.8.2-19ubuntu1) boost 1.57/1.58
步骤
直接编译。以下是终端命令
cd boost_1_57_0
bash bootstrap.sh
./b2
这样就能在boost_1_57_0/stage/lib/下找到所有的库文件。
如果用cmake来组织编译,以下是主工程的CMakeLists.txt里的部分内容:
include(ExternalProject)
ExternalProject_Add(boost
  SOURCE_DIR ${ROOT_DIR}/third_party/boost_1_57_0
  CONFIGURE_COMMAND bash ${ROOT_DIR}/third_party/boost_1_57_0/bootstrap.sh --with-libraries=date_time,thread,filesystem,system
  BUILD_COMMAND ${ROOT_DIR}/third_party/boost_1_57_0/b2 -j10 cflags=-fPIC cxxflags=-fPIC cxxflags=-fvisibility=hidden cxxflags=-fvisibility-inlines-hidden cxxflags=-fexceptions cxxflags=-DBOOST_NO_RTTI
  BUILD_IN_SOURCE 1
  INSTALL_COMMAND ""
)
set(
  BOOST_LIBRARIES
  ${ROOT_DIR}/third_party/boost_1_57_0/stage/lib/libboost_date_time.a
  ${ROOT_DIR}/third_party/boost_1_57_0/stage/lib/libboost_system.a
  ${ROOT_DIR}/third_party/boost_1_57_0/stage/lib/libboost_thread.a
  ${ROOT_DIR}/third_party/boost_1_57_0/stage/lib/libboost_filesystem.a
)
# ...
# 下面是设置链接和依赖
target_link_libraries(your_target ${BOOST_LIBRARIES})
add_dependencies(your_target boost)可留意b2 -j10 cflags=-fPIC cxxflags=-fPIC cxxflags=-fvisibility=hidden cxxflags=-fvisibility-inlines-hiddencxxflags=-fexceptions cxxflags=-DBOOST_NO_RTTI 如果要传递多个cflags,需要重复键名,而不是加双引号把多个值赋给同一个。红色的部分是隐藏符号。
6.Mac OS X编译
环境
OS X Yosemite 10.10.3 Xcode 6.3.1(6D1002) boost 1.57/1.58
步骤
和Linux相同。集成到Xcode的步骤和iOS类似。
转自:hursing的CSDN博客
- 文章2321
- 用户1336
- 访客12196918
生命在每道缝隙和角落醒来。