这是 react native 配置极光推送使用的组件,比较常用https://github.com/jpush/jpush-react-native 先把组件地址贴出来,方便大家使用参考。
不扯没用的,还要洗洗睡觉,直接把自己配置iOS极光的步骤给大家贴出来
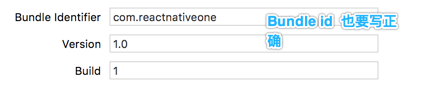
1,首先大家项目环境,签名证书什么都配置完毕,开始集成推送的前提下
在项目当前目录执行:
npm install jpush-react-native --save
rnpm link jpush-react-native
注释:如果没有安装 rnpm 先 npm install rnpm 安装 rnpm(详情百度。。。)
2, 执行完之后,打开 Xcode ,在 iOS 工程 target 的 Build Phases->Link Binary with Libraries 中加入如下库
- libz.tbd
- CoreTelephony.framework
- Security.framework
- CFNetwork.framework
- CoreFoundation.framework
- SystemConfiguration.framework
- Foundation.framework
- UIKit.framework
- UserNotifications.framework
- libresolv.tbd
- 在 AppDelegate.h 文件中 导入头文件
#import <RCTJPushModule.h>
#ifdef NSFoundationVersionNumber_iOS_9_x_Max
#import <UserNotifications/UserNotifications.h>
#endif
- 在 AppDelegate.h 文件中 填写如下代码,这里的的 appkey、channel、和 isProduction 填写自己的
static NSString *appKey = @"";     //填写appkey
static NSString *channel = @"";    //填写channel   一般为nil
static BOOL isProduction = false;  //填写isProdurion  平时测试时为false ,生产时填写true
- 在AppDelegate.m 的didFinishLaunchingWithOptions 方法里面添加如下代码
- (BOOL)application:(UIApplication *)application didFinishLaunchingWithOptions:(NSDictionary *)launchOptions
{
    if ([[UIDevice currentDevice].systemVersion floatValue] >= 10.0) {
 #ifdef NSFoundationVersionNumber_iOS_9_x_Max
    JPUSHRegisterEntity * entity = [[JPUSHRegisterEntity alloc] init];
     entity.types = UNAuthorizationOptionAlert|UNAuthorizationOptionBadge|UNAuthorizationOptionSound;
     [JPUSHService registerForRemoteNotificationConfig:entity delegate:self];
#endif
} else if ([[UIDevice currentDevice].systemVersion floatValue] >= 8.0) {
    [JPUSHService registerForRemoteNotificationTypes:(UIUserNotificationTypeBadge |
                                                      UIUserNotificationTypeSound |
                                                      UIUserNotificationTypeAlert)
                                          categories:nil];
  } else {
        //这里是支持 iOS8之前的系统,不需要的可以删掉
    [JPUSHService registerForRemoteNotificationTypes:(UIRemoteNotificationTypeBadge |
                                                      UIRemoteNotificationTypeSound |
                                                      UIRemoteNotificationTypeAlert)
                                          categories:nil];
  }
  [JPUSHService setupWithOption:launchOptions appKey:appKey
                        channel:channel apsForProduction:isProduction];
}- 在AppDelegate.m 的didRegisterForRemoteNotificationsWithDeviceToken 方法中添加 [JPUSHService registerDeviceToken:deviceToken]; 如下所示
- (void)application:(UIApplication *)application
didRegisterForRemoteNotificationsWithDeviceToken:(NSData *)deviceToken {
  [JPUSHService registerDeviceToken:deviceToken];
}- 为了在收到推送点击进入应用能够获取该条推送内容需要在 AppDelegate.m didReceiveRemoteNotification 方法里面添加 [[NSNotificationCenter defaultCenter] postNotificationName:kJPFDidReceiveRemoteNotification object:userInfo] 方法,注意:这里需要在两个方法里面加一个是iOS7以前的一个是iOS7即以后的,如果AppDelegate.m 没有这个两个方法则直接复制这两个方法,在 iOS10 的设备则可以使用JPush 提供的两个方法;如下所示
- (void)application:(UIApplication *)application didReceiveRemoteNotification:(NSDictionary *)userInfo {
  // 取得 APNs 标准信息内容
  [[NSNotificationCenter defaultCenter] postNotificationName:kJPFDidReceiveRemoteNotification object:userInfo];
}
//iOS 7 Remote Notification
- (void)application:(UIApplication *)application didReceiveRemoteNotification:  (NSDictionary *)userInfo fetchCompletionHandler:(void (^)   (UIBackgroundFetchResult))completionHandler {
  [[NSNotificationCenter defaultCenter] postNotificationName:kJPFDidReceiveRemoteNotification object:userInfo];
}
// iOS 10 Support
- (void)jpushNotificationCenter:(UNUserNotificationCenter *)center willPresentNotification:(UNNotification *)notification withCompletionHandler:(void (^)(NSInteger))completionHandler {
  // Required
  NSDictionary * userInfo = notification.request.content.userInfo;
  if([notification.request.trigger isKindOfClass:[UNPushNotificationTrigger class]]) {
    [JPUSHService handleRemoteNotification:userInfo];
    [[NSNotificationCenter defaultCenter] postNotificationName:kJPFDidReceiveRemoteNotification object:userInfo];
  }
  completionHandler(UNNotificationPresentationOptionAlert); // 需要执行这个方法,选择是否提醒用户,有Badge、Sound、Alert三种类型可以选择设置
}
// iOS 10 Support
- (void)jpushNotificationCenter:(UNUserNotificationCenter *)center didReceiveNotificationResponse:(UNNotificationResponse *)response withCompletionHandler:(void (^)())completionHandler {
  // Required
  NSDictionary * userInfo = response.notification.request.content.userInfo;
  if([response.notification.request.trigger isKindOfClass:[UNPushNotificationTrigger class]]) {
    [JPUSHService handleRemoteNotification:userInfo];
    [[NSNotificationCenter defaultCenter] postNotificationName:kJPFDidReceiveRemoteNotification object:userInfo];
  }
  completionHandler();  // 系统要求执行这个方法
}
这些步骤 git 上面都有,但接下来的才是鸡汤!!!
在 Xcode 中打开 Push Notifications!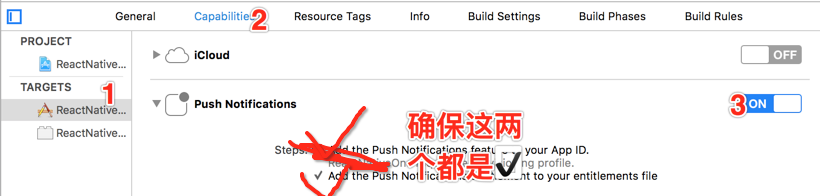
2)
3)
然后在 js 代码里面通过如下监听回调获取通知,最好实在项目入口文件里监听
var { NativeAppEventEmitter } = require('react-native');
componentDidMount (){
        var subscription = NativeAppEventEmitter.addListener(
          'ReceiveNotification',
          (notification) => console.log(notification)
        );
}
...
// 千万不要忘记忘记取消订阅, 通常在componentWillUnmount函数中实现。
subscription.remove();
前前后后在 react native 配置里三四遍,配置并不难,特摘极光 git 上说明加上本人配置过程中的踩过的坑,供大家参考,如果有什么不正确的地方望大家及时指出,谢谢
来自:http://www.cnblogs.com/yazhengwang/p/yazheng007.html
收藏的用户(0) X
正在加载信息~
推荐阅读
最新回复 (0)
站点信息
- 文章2306
- 用户1336
- 访客11534584
每日一句
You had me at hello; it was love at first sight. — Friends
你一开口我就沦陷了;那是爱情的初见。—《老友记》
你一开口我就沦陷了;那是爱情的初见。—《老友记》
 阿里云再次搬迁笔记
 利用Internet Download Manager下载Google云盘大文件
 Linux查看进程及相关操作常用命令
 5G:无线网络的未来?
 免费xiuno博客主题【最后更新:2019.5.20】
 Run-Time Check Failure #0 - The value of ESP was not properly saved across a function call. This is
 IDEA创建SpringBoot项目详细步骤
 C++实现NAT检测程序
 easypoi快捷表格框架使用
 Xposed框架的使用
 安卓准备向手机厂商收费?
 解决SSH连接问题packet too long 1349676920
 Android 8.0应用图标适配
新会员