《精通GDI编程》里的代码,在学习过程中对它加以总结,以防以后用到,所有代码都是在MFC 单文档中实现的,写在View::OnDraw(CDC */*pDC*/)中
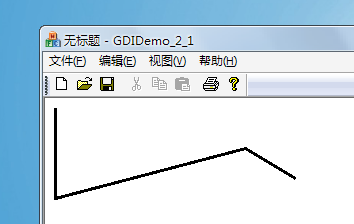
2、连接线--------DrawLines
讲解:points数组中的每个点都是连接线上的转折点,DrawLines会把它们按照顺序一个个连接起来
4、一次画多个矩形----DrawRectangles
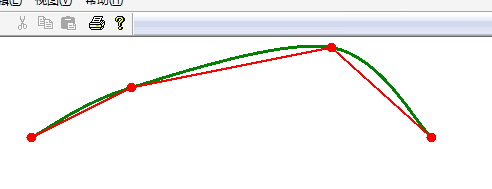
注意:这里为了比较画曲线与画直线连接线的区别,我用绿色画的曲线,用红色画的直线连接线,同时画出了连接点,大家可以比较一下。
6、画闭合曲线
注意:蓝色点是开始点,黑色点是结束点 7、画多边形-----DrawPolygon,既然能画闭合的曲线,肯定也有闭合的直线,当然闭合的直线也就是所谓的多边形
8、画弧线----DrawArc
9、画扇形----DrawPie
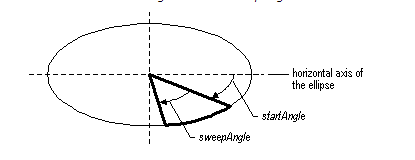
先出效果图:
这里要对它两上名词讲解一下,什么叫startAngle(开始度数),什么叫sweepAngle(范围度数也能叫扫过度数,我译的,嘿嘿)
看下MSDN里对DrawPie函数的讲解就会懂了,里面有这个图,给大家看一下
注意:从结果图中也可以看出填充区域(背景)和边框是分离的,用FillClosedCurve来填充背景色,用DrawClosedCurve来画边框
2、填充椭圆---FillEllipse,边框对应:DrawEllipse
还有类似的几个函数,这里就不一 一讲解了
它们是:
还有是关于路径和区域的,先记下,后面再说
形式二:Status DrawString( const WCHAR*string, INT length, const Font*font, const RectF&layoutRect, const StringFormat*stringFormat, const Brush*brush);
形式三:Status DrawString( const WCHAR*string, INTlength, const Font* font, const PointF&origin, const StringFormat* stringFormat, const Brush* brush);
这种形式是形式一与形式二的结合,指定写字开始点和字体格式,这里就不举例了。
画线/边框(Pen)
1、画单线-------DrawLinePen pen(Color(255,0,0,0),3); PointF L_PTStart(0,0); PointF L_PTEnd(100,10); graphics.DrawLine(&pen,L_PTStart,L_PTEnd);
2、连接线--------DrawLines
	Pen blackPen(Color(255, 0, 0, 0), 3);
	PointF point1(10.0f, 10.0f);
	PointF point2(10.0f, 100.0f);
	PointF point3(200.0f, 50.0f);
	PointF point4(250.0f, 80.0f);
	PointF points[4] = {point1, point2, point3, point4};
	PointF* pPoints = points;
	graphics.DrawLines(&blackPen, pPoints, 4);
讲解:points数组中的每个点都是连接线上的转折点,DrawLines会把它们按照顺序一个个连接起来
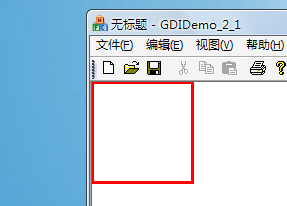
	Pen blackPen(Color(255,255, 0, 0), 3);
 	Rect rect(0, 0, 100, 100);
 	graphics.DrawRectangle(&blackPen, rect);
4、一次画多个矩形----DrawRectangles
	Pen blackPen(Color(255, 0, 0, 0), 3);
	PointF point1(10.0f, 10.0f);
	PointF point2(10.0f, 100.0f);
	PointF point3(200.0f, 50.0f);
	PointF point4(250.0f, 80.0f);
	PointF points[4] = {point1, point2, point3, point4};
	PointF* pPoints = points;
graphics.DrawLines(&blackPen, pPoints, 4); 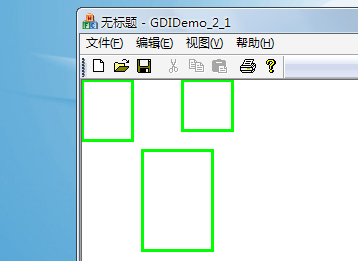
	Pen greenPen(Color::Green, 3);
	PointF point1(100.0f, 100.0f);
	PointF point2(200.0f, 50.0f);
	PointF point3(400.0f, 10.0f);
	PointF point4(500.0f, 100.0f);
	PointF curvePoints[4] = {
		point1,
		point2,
		point3,
		point4};
		PointF* pcurvePoints = curvePoints;
		// 画曲线
		graphics.DrawCurve(&greenPen, curvePoints, 4);
		//画连接点和直线连接线
		SolidBrush redBrush(Color::Red);
		graphics.FillEllipse(&redBrush, Rect(95, 95, 10, 10));//画连接点
		graphics.FillEllipse(&redBrush, Rect(195, 45, 10, 10));
		graphics.FillEllipse(&redBrush, Rect(395, 5, 10, 10));
		graphics.FillEllipse(&redBrush, Rect(495, 95, 10, 10));
		Pen redPen(Color::Red, 2);
		graphics.DrawLines(&redPen,curvePoints,4);//画连接线
注意:这里为了比较画曲线与画直线连接线的区别,我用绿色画的曲线,用红色画的直线连接线,同时画出了连接点,大家可以比较一下。
6、画闭合曲线
	Pen greenPen(Color::Green, 3);
	PointF point1(100.0f, 100.0f);//开始点
	PointF point2(200.0f, 50.0f);
	PointF point3(400.0f, 10.0f);
	PointF point4(500.0f, 100.0f);
	PointF point5(600.0f, 200.0f);
	PointF point6(700.0f, 400.0f);
	PointF point7(500.0f, 500.0f);//结束点
	PointF curvePoints[7] = {
		point1,
		point2,
		point3,
		point4,
		point5,
		point6,
		point7};
		PointF* pcurvePoints = curvePoints;
		//画闭合曲线
		graphics.DrawClosedCurve(&greenPen, curvePoints, 7);
		//画连接点
		SolidBrush redBrush(Color::Red);
		SolidBrush startBrush(Color::Blue);
		SolidBrush endBrush(Color::Black);
		graphics.FillEllipse(&startBrush, Rect(95, 95, 10, 10));
		graphics.FillEllipse(&redBrush, Rect(495, 95, 10, 10));
		graphics.FillEllipse(&redBrush, Rect(195, 45, 10, 10));
		graphics.FillEllipse(&redBrush, Rect(395, 5, 10, 10));
		graphics.FillEllipse(&redBrush, Rect(595, 195, 10, 10));
		graphics.FillEllipse(&redBrush, Rect(695, 395, 10, 10));
graphics.FillEllipse(&endBrush, Rect(495, 495, 10, 10)); 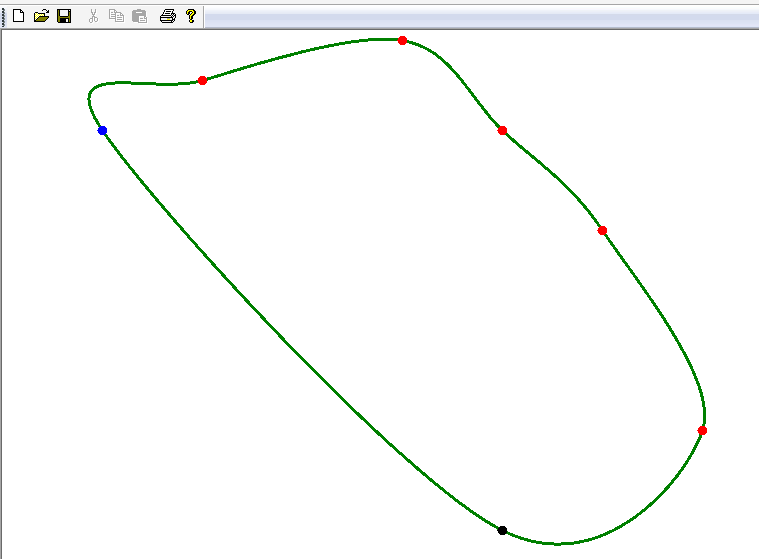
注意:蓝色点是开始点,黑色点是结束点 7、画多边形-----DrawPolygon,既然能画闭合的曲线,肯定也有闭合的直线,当然闭合的直线也就是所谓的多边形
Pen blackPen(Color(255, 0, 0, 0), 3);
	//创建点数组,DrawPolygon会按这些点的顺序逐个连接起来
	PointF point1(100.0f, 100.0f);
	PointF point2(200.0f, 130.0f);
	PointF point3(150.0f, 200.0f);
	PointF point4(50.0f, 200.0f);
	PointF point5(0.0f, 130.0f);
	PointF points[5] = {point1, point2, point3, point4, point5};
	PointF* pPoints = points;
	// 画多边形,也就是闭合直线
graphics.DrawPolygon(&blackPen, pPoints, 5); 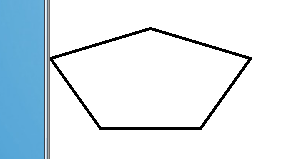
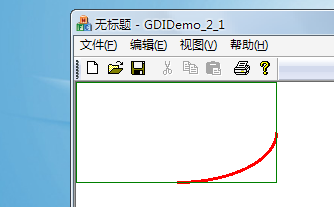
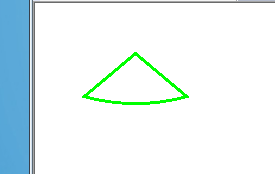
8、画弧线----DrawArc
 Pen redPen(Color::Red, 3);
 RectF ellipseRect(0, 0, 200, 100);
 REAL startAngle = 0.0f;//起始度数
 REAL sweepAngle = 90.0f;//结尾时的度数
 // 画弧线
 graphics.DrawArc(&redPen, ellipseRect, startAngle, sweepAngle);
 //画出边框,做为参考
 Pen greenPen(Color::Green, 1);
 graphics.DrawRectangle(&greenPen,ellipseRect);
9、画扇形----DrawPie
	Pen blackPen(Color(255, 0, 255, 0), 3);
	// 定义椭圆,然后在里面截一部分作为最终的扇形
	RectF ellipseRect(0, 0, 200, 100);
	REAL startAngle = 40.0f;
	REAL sweepAngle = 100.0f;
	//画扇形
	graphics.DrawPie(&blackPen, ellipseRect, startAngle, sweepAngle);
先出效果图:
这里要对它两上名词讲解一下,什么叫startAngle(开始度数),什么叫sweepAngle(范围度数也能叫扫过度数,我译的,嘿嘿)
看下MSDN里对DrawPie函数的讲解就会懂了,里面有这个图,给大家看一下
填充区域(SolidBrush)
1、填充闭合区域----FillClosedCurve,边框对应:DrawClosedCurve SolidBrush blackBrush(Color(255, 0, 0, 0));
PointF point1(100.0f, 100.0f);
PointF point2(200.0f, 50.0f);
PointF point3(250.0f, 200.0f);
PointF point4(50.0f, 150.0f);
PointF points[4] = {point1, point2, point3, point4};
//填充闭合区域
graphics.FillClosedCurve(&blackBrush, points, 4);
//为闭合区域画边框
Pen curPen(Color::Green,3);
graphics.DrawClosedCurve(&curPen,points,4); 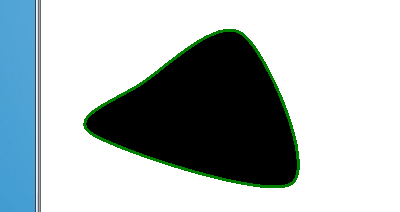
注意:从结果图中也可以看出填充区域(背景)和边框是分离的,用FillClosedCurve来填充背景色,用DrawClosedCurve来画边框
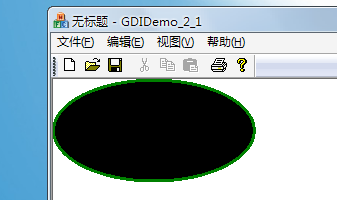
2、填充椭圆---FillEllipse,边框对应:DrawEllipse
	SolidBrush blackBrush(Color(255, 0, 0, 0));
	RectF ellipseRect(0.0f, 0.6f, 200.8f, 100.9f);
	//填充椭圆
	graphics.FillEllipse(&blackBrush, ellipseRect);
	//画边框,当然也可以不画
	Pen borderPen(Color::Green,3);
	graphics.DrawEllipse(&borderPen,ellipseRect);
还有类似的几个函数,这里就不一 一讲解了
它们是:
FillPie(Brush* brush, RectF& rect, REAL startAngle, REAL sweepAngle)    //填充扇形,对应DrawPie
FillPolygon(Brush* brush, PointF* points, INT count)                       //填充多边形,对应DrawPolygon
FillRectangle(Brush* brush, RectF& rect)                                          //填充矩形,对应DrawRectangle
FillRectangles(Brush* brush, RectF* rects, INT count)                   //同时填充多个矩形,对应DrawRectangles
还有是关于路径和区域的,先记下,后面再说
Status FillPath( const Brush* brush, const GraphicsPath*path);
Status FillRegion( const Brush* brush, const Region*region);
写字(SolidBrush)
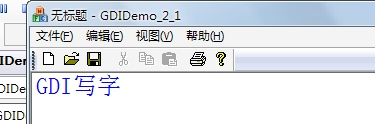
形式一:Status DrawString( const WCHAR*string, INTlength, const Font* font, const PointF&origin, const Brush*brush);Graphics graphics(this->GetDC()->m_hDC); SolidBrush brush(Color(255,0,0,255)); FontFamily fontfamily(L"宋体"); Font font(&fontfamily,24,FontStyleRegular,UnitPixel); PointF pointf(0,0);//PointF类对点进行了封装,这里是指定写字的开始点 graphics.DrawString(L"GDI写字",-1,&font,pointf,&brush); //DrawString还有另外两个重载形式,能实现更强大的功能
形式二:Status DrawString( const WCHAR*string, INT length, const Font*font, const RectF&layoutRect, const StringFormat*stringFormat, const Brush*brush);
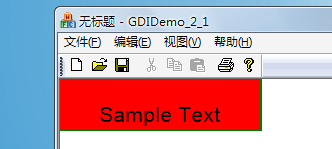
	WCHAR string[256];
	wcscpy(string, L"Sample Text");
	// Initialize arguments.
	Font myFont(L"Arial", 16);//字体
	RectF layoutRect(0.0f, 0.0f, 200.0f, 50.0f);//矩形
	//设定字体格式
	StringFormat format;
	format.SetAlignment(StringAlignmentCenter); //水平方向的对齐方式,这里设置为水平居中
	format.SetLineAlignment(StringAlignmentFar);//垂直方向的对齐方式,这里设置为垂直居下
	SolidBrush blackBrush(Color(255, 0, 0, 0));
	//画矩形边框
	graphics.DrawRectangle(&Pen(Color::Green, 3), layoutRect);
	//填充矩形背景
	graphics.FillRectangle(&SolidBrush(Color(255,255,0,0)),layoutRect);
	//DrawString,一定要先画背景再写字,要不然,字会被背景覆盖
	graphics.DrawString(
		string,
		wcslen(string),
		&myFont,
		layoutRect,
		&format,
		&blackBrush);
形式三:Status DrawString( const WCHAR*string, INTlength, const Font* font, const PointF&origin, const StringFormat* stringFormat, const Brush* brush);
这种形式是形式一与形式二的结合,指定写字开始点和字体格式,这里就不举例了。
收藏的用户(0) X
正在加载信息~
推荐阅读
最新回复 (0)
站点信息
- 文章2306
- 用户1336
- 访客11539539
每日一句
The truth is out there, and it's waiting. — The X-Files
真相在外面,它在等待。 —《X档案》
真相在外面,它在等待。 —《X档案》
新会员