Android 提供了强大的测试工具。这些工具继承于 JUnit 的同时扩展了额外的特性,提供更加便捷的系统对象 Mock 类,使用 instrumentation 操控被测应用。 整个 Android 测试环境在 Testing Fundamentals 文档里讨论过。
这篇指南为我们展示了一个简单的 Android 应用,并引导我们一步一步为它创建测试应用。通过遍历整个过程,为我们介绍了 Android 测试工具。 这个测试应用展示了以下几个关键点:/samples/android-18/legacy/Spinner 找到被测应用的代码。同时,你可以在 /samples/android-18/legacy/SpinnerTest 里找到测试应用的代码。
我们将会一步一步创建 SpinnerTest,当然你也可以先看一遍代码,然后再回过头来看我们的指南。
接下来,我们为 SpinnerActivity 项目生成测试项目:
目前生成的测试项目,是一个空项目。 Eclipse 和 ADT 只是帮我们生成好了配置文件。我们主要看下 SpinnerActivityTest 底下的 AndroidManifest.xml
Eclipse 已经帮我们注入了 Instrumentation。注意看 instrumentation 这个节点。通过 targetPackage 这个属性,Android 知道哪个是被测应用,并且如何启动被测程序。name 属性告诉 Android,当运行这个测试应用时,需要用 激活了Instrumentation 的 TestRunner。
首先我们要选择一种 Android test case class 来继承。根据不同的 component,选择不同的 Android test case class 。这里我们测试 Activity,所以选择和 Activity 有关的。我们在真实环境中用的最多的是 ActivityInstrumentationTestCase2。 这个类提供了很多便捷的方法可以直接和 UI 交互。
不过 super("com.android.example.spinner", SpinnerActivity.class); 这个已经 deprecated 了。 看代码:
我们在 setUp 方法里去拿一些数据,以便每次测试运行需要。值得关注的是 setActivityInitialTouchMode(false);,如果要发送按键事件给被测应用的话,必须在开始任何 Activity 前关闭 touch 模式,否则发送会被忽略。看它的代码实现:
事实上在 ActivityInstrumentationTestCase2 的 setUp 方法里,已经将 touchMode 设置为 false 了。
这个测试显示了 instrumentation 的威力。只有基于 instrumentation 的测试类才能发送按键事件(触摸事件)给被测应用。使用 instrumentation, 就可以不用通过截图,录制或者人工来测试 UI。
为了使用 Spinner,首先我们用 requestFocus() 和 setSelection() 取得焦点并默认选中一个。两个方法都是和 View 直接交互,所以我们需要用特殊的形式调用他们。
测试应用里面,直接和被测应用的 View 交互的代码,必须放在被测应用的线程(也叫UI线程)里。我们用 Activity.runOnUiThread() 方法。这个方法需要一个匿名的 Runnable 类作为参数。我们可以重写 Runnable 类的 run() 方法.
我们用 sendKeys() 方法发送按键事件给 UI。这个方法不需要在 UI 线程内运行,因为 Android 通过 instrumentation 把按键事件传递给被测应用。
我们来看代码:
需要解释的一点是, sendKeys() 方法是来自 ActivityInstrumentationTestCase2 的父类的父类 InstrumentationTestCase。 大致的实现是得到 instrumentation ,然后调用 instrumentation 的 sendKeyDownUpSync 方法,有兴趣的人可以去看下实现。
至此,一个简单的 UI 测试就写好了。大家可以试着运行下。
保持状态是应用的一个非常重要的特性。通常我们会遇到:
我们的被测应用 SpinnerActivity 是这样保持状态的:(具体实现可以看代码)
####测试用例 1:整个应用关闭后重启,Spinner 的选项会被保持。
####测试用例 2:Activity 暂停后恢复,Spinner 的选项会被保持。
需要注意的是,第二个测试使用了 @UiThreadTest 注释。这是因为 instr.callActivityOnResume(mActivity) 实际上调用了 SpinnerActivity 的 onResume 方法。而在这个 onResume 方法里,代码直接操纵了 View。
所有和 View 直接交互的代码,必须放在 UI 线程中执行。
这篇指南为我们展示了一个简单的 Android 应用,并引导我们一步一步为它创建测试应用。通过遍历整个过程,为我们介绍了 Android 测试工具。 这个测试应用展示了以下几个关键点:
- 一个 Android 测试本身就是一个 Android 应用。通过 AndroidManifest.xml 将自己和被测应用联系在一起。
- 和一般应用不同的是, Android 测试应用包含了一个或者多个测试用例而不是多个 Android component。每个测试用例都是一个类。
- Android test case classes 继承于 JUnit TestCase class。
- Android Activity 的 test case 继承于 JUnit TestCase class。而且通过 instrumentation, 可以和被测应用进行交互。 你可以直接发送按键事件和触摸事件给 UI。
- 基于不同的 component (application, activity, content provider, 或者 service),你需要选择不同的 Android 测试用例类。
- Eclipse/ADT 提供的测试工具支持创建测试应用,运行测试应用和查看结果。
- 初始条件测试。我们要测试被测应用是否正确地初始化了。这也是被测应用的 onCreate() 方法的单元测试。初始条件测试也为后续的测试提供了信心。
- UI 测试。测试 UI 操作是否正常正确工作。UI 测试展示了 activity 测试中 instrumentation 的特性。你可以从测试应用发送按键事件去被测应用,从而实现 UI 自动化测试。
- 状态管理测试。 测试应用保持状态的代码。状态管理测试展示了 test runner 的 instrumentation 特性,你可以在测试任何 component 时候用到它。
先决条件:
- Android 编程的基础知识。如果你从没写过 Android 应用,先学下 Building Your First App。我们的被测应用来自于 Android SDK 里的面的样例代码 Spinner, 如果你想对 Spinner 了解更多,你可能需要看下 Spinner 样例代码。
- 你需要熟悉 Android 测试框架和概念。如果你还没有探索过 Android 测试,那去读下 Testing Fundamentals guide。
- Eclipse 加 ADT。这篇指南描述了如何使用 Eclipse 和 ADT 配置和运行测试应用。如果你还没有安装 Eclipse 和 ADT 插件, 那先按照 Installing the SDK 里说的装好 Eclipse 和 ADT。如果你没用过 Eclipse,照着文档里的附录做吧。
安装样例代码
在这篇指南里,我们用的是 Android SDK 里面提供的样例代码 Spinner。你可以在我们将会一步一步创建 SpinnerTest,当然你也可以先看一遍代码,然后再回过头来看我们的指南。
配置 Android 模拟器
在这篇指南里,我们会使用 Android 模拟器来运行应用。 我们需要一个 Android 虚拟机 (AVD),这个 AVD API level 需要大于或者等于之前在项目里设置的。如果你不会创建 AVD 的话,先看看 Creating an AVD。配置项目
我们先导入 SpinnerActivity 项目:- 打开 Eclipse, 选择 File>Import 到 Import 窗口。
- 选择 Existing Android Code into Workspace,进入 Import Projects 窗口。
- Root Directory 选择 SpinnerActivity 代码所在位置。 比如:
/samples/android-18/legacy/Spinner。 - 其他默认,点击 Finish。
接下来,我们为 SpinnerActivity 项目生成测试项目:
- 在 Package Explorer 里面右击 SpinnerActivity 项目,选择 Android Tools>New Test Project..., 会弹出 "New Android Test Project" 对话框。
- Project Name 命名为 SpinnerActivityTest, 然后选择 Next
- 在 Select Test Target 里面选择 SpinnerActivity,然后点击 Finish。
- 这样一个测试项目就生成了。
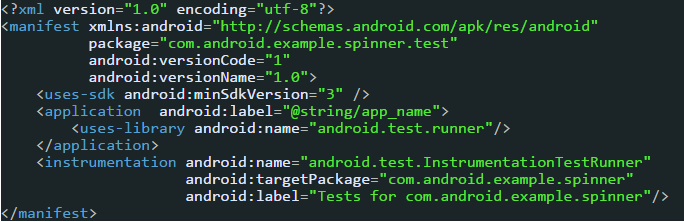
目前生成的测试项目,是一个空项目。 Eclipse 和 ADT 只是帮我们生成好了配置文件。我们主要看下 SpinnerActivityTest 底下的 AndroidManifest.xml
<?xml version="1.0" encoding="utf-8"?>
<manifest xmlns:android="http://schemas.android.com/apk/res/android"
          package="com.android.example.spinner.test"
          android:versionCode="1"
          android:versionName="1.0">
    <uses-sdk android:minSdkVersion="3" />
    <application  android:label="@string/app_name">
        <uses-library android:name="android.test.runner"/>
    </application>
    <instrumentation android:name="android.test.InstrumentationTestRunner"
                     android:targetPackage="com.android.example.spinner"
                     android:label="Tests for com.android.example.spinner"/>
</manifest>
Eclipse 已经帮我们注入了 Instrumentation。注意看 instrumentation 这个节点。通过 targetPackage 这个属性,Android 知道哪个是被测应用,并且如何启动被测程序。name 属性告诉 Android,当运行这个测试应用时,需要用 激活了Instrumentation 的 TestRunner。
创建测试用例类
接下来,我们需要创建测试类。在这篇指南里,我们将创建一个测试类,包含:- 测试配置。 我们一般用 JUnit 的 setUp 方法来做一些准备工作,和在跑每个测试前需要运行的任务。
- 初始条件测试。 这是一个很好的测试技术。通过 instrumentation,我们可以在没有启动 主Activity 前就可以观察这个应用。初始条件测试会检查被测应用的某些重要对象是否初始化。如果这个测试都失败了,那别的基于该被测应用的测试也是没有意义的。 > 注意:初始条件测试和 JUnit 的 setUp 方法是不一样的。JUnit 的 setUp 方法在每个测试用例运行前运行,它的主要目的是创建一个干净的环境。初始条件测试只运行一次,它的目的是检查被测程序是否可以被测试了。
- UI 测试。我们会教你如何使用强大的 Android 自动化测试工具。
- 状态管理测试。这里将会讲述一些 Android 如何保持状态的技术。从用户体验的角度来看,应用不应该丢失任何当前状态,无论是突然有电话进来或者内存不够导致崩溃。Android Activity 的生命周期提供了方法维护这些状态,我们的被测程序中也用到了。这里,我们会验证这些方法。
首先我们要选择一种 Android test case class 来继承。根据不同的 component,选择不同的 Android test case class 。这里我们测试 Activity,所以选择和 Activity 有关的。我们在真实环境中用的最多的是 ActivityInstrumentationTestCase2。 这个类提供了很多便捷的方法可以直接和 UI 交互。
添加测试类文件
- 展开前面生成的 SpinnerActivityTest 的 src 文件夹。
- 在 com.android.example.spinner.test 这个package 创建一个类,这个类必须继承 ActivityInstrumentationTestCase2。 如:
public class SpinnerActivityTest extends ActivityInstrumentationTestCase2<SpinnerActivity> {
...
}
添加构造函数
为了确保测试应用正确实例化了,你必须配置一个构造函数,test runner 在实例化测试类的时候,会调用这个构造函数。这个构造函数必须是无参的,它的主要作用就是把信息传递给父类的默认构造函数。看代码: /*
* Constructor for the test class. Required by Android test classes. The constructor
* must call the super constructor, providing the Android package name of the app under test
* and the Java class name of the activity in that application that handles the MAIN intent.
*/
public SpinnerActivityTest() {
super("com.android.example.spinner", SpinnerActivity.class);
}不过 super("com.android.example.spinner", SpinnerActivity.class); 这个已经 deprecated 了。 看代码:
/**
     * Creates an {@link ActivityInstrumentationTestCase2}.
     *
     * @param pkg ignored - no longer in use.
     * @param activityClass The activity to test. This must be a class in the instrumentation
     * targetPackage specified in the AndroidManifest.xml
     *
     * @deprecated use {@link #ActivityInstrumentationTestCase2(Class)} instead
     */
    @Deprecated
    public ActivityInstrumentationTestCase2(String pkg, Class<T> activityClass) {
        this(activityClass);
    }
    /**
     * Creates an {@link ActivityInstrumentationTestCase2}.
     *
     * @param activityClass The activity to test. This must be a class in the instrumentation
     * targetPackage specified in the AndroidManifest.xml
     */
    public ActivityInstrumentationTestCase2(Class<T> activityClass) {
        mActivityClass = activityClass;
    }
添加 setUp 方法
setUp() 方法其实就是 JUnit 的 setUp() 方法。直接看代码, /* 里面涉及的实例变量,假设已经存在了。 */
@Override
protected void setUp() throws Exception {
/*
* Call the super constructor (required by JUnit)
*/
super.setUp();
/*
* prepare to send key events to the app under test by turning off touch mode.
* Must be done before the first call to getActivity()
*/
setActivityInitialTouchMode(false);
/*
* Start the app under test by starting its main activity. The test runner already knows
* which activity this is from the call to the super constructor, as mentioned
* previously. The tests can now use instrumentation to directly access the main
* activity through mActivity.
*/
mActivity = getActivity();
/*
* Get references to objects in the application under test. These are
* tested to ensure that the app under test has initialized correctly.
*/
mSpinner = (Spinner)mActivity.findViewById(com.android.example.spinner.R.id.Spinner01);
mPlanetData = mSpinner.getAdapter();
}我们在 setUp 方法里去拿一些数据,以便每次测试运行需要。值得关注的是 setActivityInitialTouchMode(false);,如果要发送按键事件给被测应用的话,必须在开始任何 Activity 前关闭 touch 模式,否则发送会被忽略。看它的代码实现:
/**
     * Call this method before the first call to {@link #getActivity} to set the initial touch
     * mode for the Activity under test.
     *
     *
If you do not call this, the touch mode will be false.  If you call this after
     * your Activity has been started, it will have no effect.
     *
     *
<b>NOTE:</b> Activities under test may not be started from within the UI thread.
     * If your test method is annotated with {@link android.test.UiThreadTest}, then you must call
     * {@link #setActivityInitialTouchMode(boolean)} from {@link #setUp()}.
     *
     * @param initialTouchMode true if the Activity should be placed into "touch mode" when started
     */
    public void setActivityInitialTouchMode(boolean initialTouchMode) {
        mInitialTouchMode = initialTouchMode;
    }
事实上在 ActivityInstrumentationTestCase2 的 setUp 方法里,已经将 touchMode 设置为 false 了。
添加初始条件测试
初始条件测试要验证:- Spinner 里面的 item 的 listener 是否初始化成功。
- 给 Spinner 提供数据的 adapter 是否初始化成功。
- adapter 里面数据的个数正确。
 /*
     * Tests the initial values of key objects in the app under test, to ensure the initial
     * conditions make sense. If one of these is not initialized correctly, then subsequent
     * tests are suspect and should be ignored.
     */
    public void testPreconditions() {
        /*
         *  An example of an initialization test. Assert that the item select listener in
         *  the main Activity is not null (has been set to a valid callback)
         */
        assertTrue(mSpinner.getOnItemSelectedListener() != null);
        /*
         * Test that the spinner's backing mLocalAdapter was initialized correctly.
         */
        assertTrue(mPlanetData != null);
        /*
         *  Also ensure that the backing mLocalAdapter has the correct number of entries.
         */
        assertEquals(mPlanetData.getCount(), ADAPTER_COUNT);
    }
添加一个 UI 测试
现在创建一个测试: 从 Spinner 插件里选择一个项目。这个测试会发送按键事件给 UI。我们要确保选择的项目是我们期盼的。这个测试显示了 instrumentation 的威力。只有基于 instrumentation 的测试类才能发送按键事件(触摸事件)给被测应用。使用 instrumentation, 就可以不用通过截图,录制或者人工来测试 UI。
为了使用 Spinner,首先我们用 requestFocus() 和 setSelection() 取得焦点并默认选中一个。两个方法都是和 View 直接交互,所以我们需要用特殊的形式调用他们。
测试应用里面,直接和被测应用的 View 交互的代码,必须放在被测应用的线程(也叫UI线程)里。我们用 Activity.runOnUiThread() 方法。这个方法需要一个匿名的 Runnable 类作为参数。我们可以重写 Runnable 类的 run() 方法.
我们用 sendKeys() 方法发送按键事件给 UI。这个方法不需要在 UI 线程内运行,因为 Android 通过 instrumentation 把按键事件传递给被测应用。
我们来看代码:
/*
     * Tests the UI of the main activity. Sends key events (keystrokes) to the UI, then checks
     * if the resulting spinner state is consistent with the attempted selection.
     */
    public void testSpinnerUI() {
        /*
         * Request focus for the spinner widget in the application under test,
         * and set its initial position. This code interacts with the app's View
         *  so it has to run on the app's thread not the test's thread.
         *
         * To do this, pass the necessary code to the application with
         * runOnUiThread(). The parameter is an anonymous Runnable object that
         * contains the Java statements put in it by its run() method.
         */
         /* 这里需要注意, 主要是因为 mSpinner 是一个 View。*/
        mActivity.runOnUiThread(
            new Runnable() {
                public void run() {
                    mSpinner.requestFocus();
                    mSpinner.setSelection(INITIAL_POSITION);
                }
            }
        );
        // Activate the spinner by clicking the center keypad key
        this.sendKeys(KeyEvent.KEYCODE_DPAD_CENTER);
        // send 5 down arrow keys to the spinner
        for (int i = 1; i <= TEST_POSITION; i++) {
            this.sendKeys(KeyEvent.KEYCODE_DPAD_DOWN);
        }
        // select the item at the current spinner position
        this.sendKeys(KeyEvent.KEYCODE_DPAD_CENTER);
        // get the position of the selected item
        mPos = mSpinner.getSelectedItemPosition();
        /*
         * from the spinner's data mLocalAdapter, get the object at the selected position
         * (this is a String value)
         */
        mSelection = (String)mSpinner.getItemAtPosition(mPos);
        /*
         * Get the TextView widget that displays the result of selecting an item from the spinner
         */
        TextView resultView =
                (TextView) mActivity.findViewById(com.android.example.spinner.R.id.SpinnerResult);
        // Get the String value in the EditText object
        String resultText = (String) resultView.getText();
        /*
         * Confirm that the EditText contains the same value as the data in the mLocalAdapter
         */
        assertEquals(resultText,mSelection);
    }
需要解释的一点是, sendKeys() 方法是来自 ActivityInstrumentationTestCase2 的父类的父类 InstrumentationTestCase。 大致的实现是得到 instrumentation ,然后调用 instrumentation 的 sendKeyDownUpSync 方法,有兴趣的人可以去看下实现。
至此,一个简单的 UI 测试就写好了。大家可以试着运行下。
添加状态管理测试
我们现在要写两个测试来验证 SpinnerActivity 暂停或者终止的时候是否会保持状态。在我们的例子里,状态就是 spinner 的当前选项。当用户选了一个项目,然后暂停或者关闭应用,然后在恢复或者重新打开应用,之前的那个项目应该还是选中的状态。保持状态是应用的一个非常重要的特性。通常我们会遇到:
- 用户可能为了接听电话从当前应用中切换出去,等接完电话再切换回来。
- 在手机切换横竖屏时,Android 系统本身也可能会重启或者关闭一个 Activity。
- 手机内存不够了,关闭一些暂时没用的 Activity 来释放资源。
我们的被测应用 SpinnerActivity 是这样保持状态的:(具体实现可以看代码)
- Activity 隐藏。其他的界面出现,Spinner 隐藏的时候,它会把 Spinner 的当前位置和值存在一个临时表单里。只要 Spinner 应用运行着,这些值就会被保留着。
- 应用被关闭。当 SpinnerActivity 被关闭的时候,它会把当前位置和值保存到一个永久的表单(其实就是 SharedPreferences)里去。当这个 Activity 重启的时候,会从这个表单里读取位置和值出来,恢复到关闭前的状态。
- Activity 重现(或者是重绘?)当 Spinner 界面重新出现的时候,它应该恢复到隐藏之前的状态。
- 应用重启。当用户再次启动 Spinner 的时候,它会恢复到关闭前的状态。
- onPaused()
- onResume()
####测试用例 1:整个应用关闭后重启,Spinner 的选项会被保持。
- 用 instrumentation 设置 Spinner 变量
- 用 Activity.finish() 方法关闭 Activity
- 用 instrumentation 的 getActivity() 方法重启
- 验证当前的状态是否和关闭前的一致
/*
     *  Tests that the activity under test maintains the spinner state when the activity halts
     *  and then restarts (for example, if the device reboots). Sets the spinner to a
     *  certain state, calls finish() on the activity, restarts the activity, and then
     *  checks that the spinner has the same state.
     *
     */
    public void testStateDestroy() {
        /*
         * Set the position and value of the spinner in the Activity. The test runner's
         * instrumentation enables this by running the test app and the main app in the same
         * process.
         */

        mActivity.setSpinnerPosition(TEST_STATE_DESTROY_POSITION);
        mActivity.setSpinnerSelection(TEST_STATE_DESTROY_SELECTION);
        // Halt the Activity by calling Activity.finish() on it
        mActivity.finish();
        // Restart the activity by calling ActivityInstrumentationTestCase2.getActivity()
        mActivity = this.getActivity();
        /*
         * Get the current position and selection from the activity.
         */
        int currentPosition = mActivity.getSpinnerPosition();
        String currentSelection = mActivity.getSpinnerSelection();
        // test that they are the same.
        assertEquals(TEST_STATE_DESTROY_POSITION, currentPosition);
        assertEquals(TEST_STATE_DESTROY_SELECTION, currentSelection);
    }
####测试用例 2:Activity 暂停后恢复,Spinner 的选项会被保持。
- 用 instrumentation 设置 Spinner 变量
- 强行调用 onPaused() 和 onResume() 方法
- 验证状态是否保持一致
/*
     * Tests that the activity under test maintains the spinner's state when the activity is
     * paused and then resumed.
     *
     * Calls the activity's onResume() method. Changes the spinner's state by
     * altering the activity's View. This means the test must run
     * on the UI Thread. All the statements in the test method may be run on
     * that thread, so instead of using the runOnUiThread() method, the
     * @UiThreadTest is used.
     */
    @UiThreadTest
    public void testStatePause() {
        /*
         * Get the instrumentation object for this application. This object
         * does all the instrumentation work for the test runner
         */
        Instrumentation instr = this.getInstrumentation();
        /*
         * Set the activity's fields for the position and value of the spinner
         */
        mActivity.setSpinnerPosition(TEST_STATE_PAUSE_POSITION);
        mActivity.setSpinnerSelection(TEST_STATE_PAUSE_SELECTION);
        /*
         *  Use the instrumentation to onPause() on the currently running Activity.
         *  This analogous to calling finish() in the testStateDestroy() method.
         *  This way demonstrates using the test class' instrumentation.
         */
        instr.callActivityOnPause(mActivity);
        /*
         * Set the spinner to a test position
         */
        mActivity.setSpinnerPosition(0);
        mActivity.setSpinnerSelection("");
        /*
         * Call the activity's onResume() method. This forces the activity
         * to restore its state.
         */
        instr.callActivityOnResume(mActivity);
        /*
         * Get the current state of the spinner
         */
        int currentPosition = mActivity.getSpinnerPosition();
        String currentSelection = mActivity.getSpinnerSelection();
        assertEquals(TEST_STATE_PAUSE_POSITION,currentPosition);
        assertEquals(TEST_STATE_PAUSE_SELECTION,currentSelection);
  }
需要注意的是,第二个测试使用了 @UiThreadTest 注释。这是因为 instr.callActivityOnResume(mActivity) 实际上调用了 SpinnerActivity 的 onResume 方法。而在这个 onResume 方法里,代码直接操纵了 View。
 Spinner restoreSpinner = (Spinner)findViewById(R.id.Spinner01);
        restoreSpinner.setSelection(getSpinnerPosition());
所有和 View 直接交互的代码,必须放在 UI 线程中执行。
总结
至此,我们所有的测试代码都完成了。接下来就是运行和调试,就不细说了。想看详细的可以移步 Activity Testing。 收藏的用户(0) X
正在加载信息~
推荐阅读
最新回复 (0)
站点信息
- 文章2306
- 用户1336
- 访客11533321
每日一句
You had me at hello; it was love at first sight. — Friends
你一开口我就沦陷了;那是爱情的初见。—《老友记》
你一开口我就沦陷了;那是爱情的初见。—《老友记》
 阿里云再次搬迁笔记
 利用Internet Download Manager下载Google云盘大文件
 Linux查看进程及相关操作常用命令
 5G:无线网络的未来?
 免费xiuno博客主题【最后更新:2019.5.20】
 Run-Time Check Failure #0 - The value of ESP was not properly saved across a function call. This is
 IDEA创建SpringBoot项目详细步骤
 C++实现NAT检测程序
 easypoi快捷表格框架使用
 Xposed框架的使用
 安卓准备向手机厂商收费?
 解决SSH连接问题packet too long 1349676920
 Android 8.0应用图标适配
新会员