Android入门之路 Day 2
Android界面开发初体
------转载请注明出处:coder-pig
本节引言:
在上一节中我们对android的系统特性与平台架构进行了初步的了解;
学会了使用Eclipse或者Android studio搭建安卓的开发环境;熟悉了对应IDE开发流程;
以及对应的工程目录;了解了一些相关的名词,aapt,dx等;命令行常用的一些adb指令;
APP的打包,编译,以及运行的流程!在本节中我们将会对android界面的开发进行初体验!
学习六大布局方式,对android四大组件进行初步的了解,以及App的生命周期,构建一个电话拨号器等!
废话不多说!
正文:
本节学习路线图:
学习路线解析:
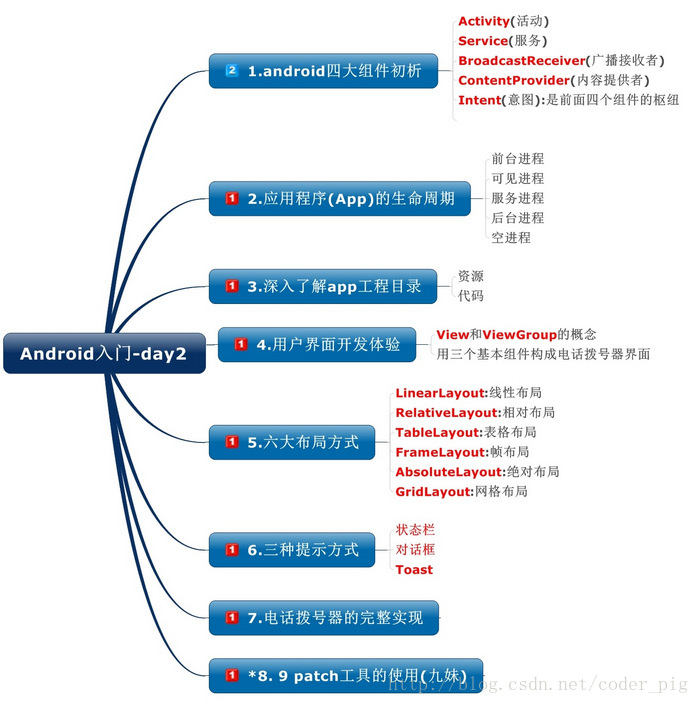
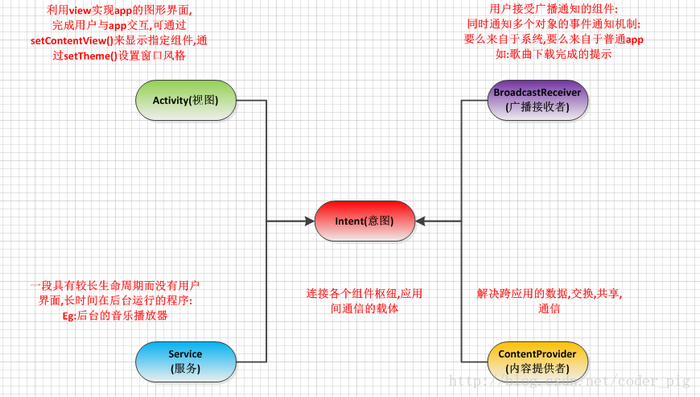
①了解下android的四大组件和Intent分别是什么,拿来做什么的!在后续章节会详细解析
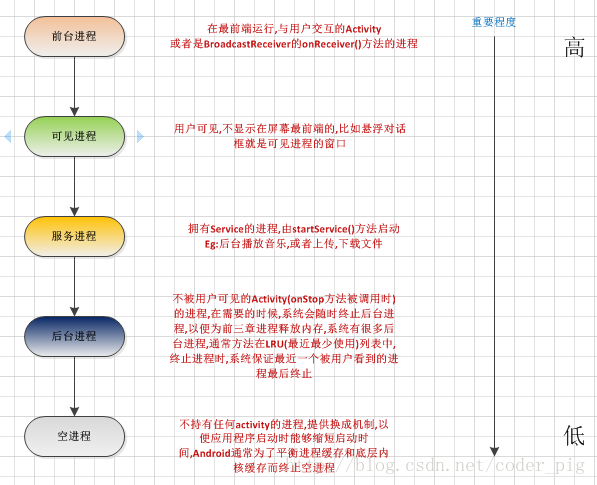
②了解下app的生命周期:五个状态
③深入解析HelloWorld的工程目录
④熟悉六大布局方式
⑤熟悉三种提示方式:状态栏,对话框与Toast
⑥电话拨号器的完整实现
⑦9patch(9妹)的使用:制作可伸缩的图片!
android四大组件与Intent初析:
应用程序(App)的生命周期:
注意:
与其他的智能手机操作系统不同:app的生命周期(存活时间)不是由进程自己控制的;
而是由android系统决定的;而影响的主要因素:该进程对于用户的重要性,以及当前系统中所剩
可用内存空间;当可用内存不足时,系统会终止某些进程以便回收内存资源!
进程级别图:
深入了解App的工程目录:
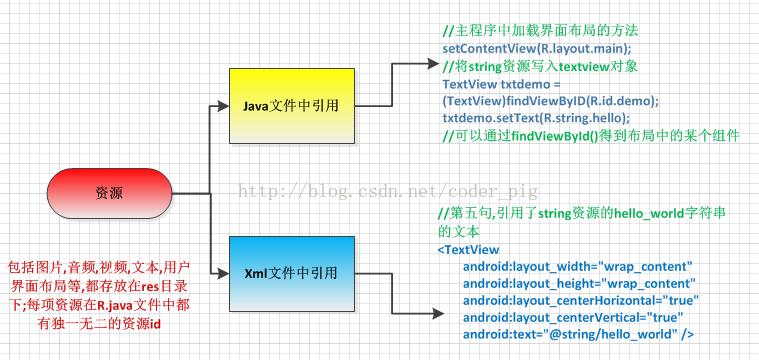
1.资源的引用:
2.工程目录下的详细代码的解析:
三个重要文件:传送门
用户界面开发初体验:
在创建我们的界面前,我们先要了解一些东西:
1.view类:是所有可视化控件的父类,提供组件描绘和时间处理方法
2.viewGroup类:可以拥有子控件,可以看作是容器
3.通常可见的android app都是由可视化控件 + 布局组成的!控件的属性可以在
xml中静态设置或者在Java代码中动态设置
好了,接着就要开始创建我们电话拨号器的布局了:
这里有两种方式:①拖拉组件②自己写代码
笔者还是比较倾向于后者,因为拖拉生成的代码有一定的冗余
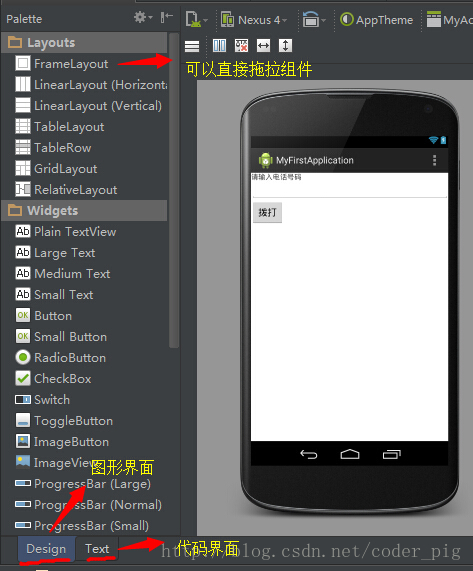
代码如下:
main.xml:
plaincopy
- <LinearLayout xmlns:android="http://schemas.android.com/apk/res/android"
- xmlns:tools="http://schemas.android.com/tools"
- android:id="@+id/LinearLayout1"
- android:layout_width="match_parent"
- android:layout_height="match_parent"
- android:orientation="vertical"
- tools:context=".MyActivity"
- >
- <TextView
- android:layout_width="wrap_content"
- android:layout_height="wrap_content"
- android:text="@string/input_num" />
- <EditText
- android:layout_width="match_parent"
- android:layout_height="wrap_content"
- android:id="@+id/editnum"/>
- <Button
- android:layout_width="wrap_content"
- android:layout_height="wrap_content"
- android:text="@string/btn_call"
- android:id="@+id/btncall"/>
- </LinearLayout>
代码解析:
就是定义了一个LinearLayout(线性布局方式)并且把排列方向设置为竖直,即一行放置一个组件;
接着依次定义了TextView(文本标签),EditText(输入框),Button(按钮),很简单
Android的六大布局
LinearLayout:线性布局
链接:android---LinearLayout(线性布局)详解
RelativeLayout:相对布局
链接:android---RelativeLayout(相对布局)详解
FrameLayout:帧布局
链接:android---FrameLayout(帧布局)详解
TableLayout:表格布局
链接:android---TableLayout(表格布局)详解
AbsoluteLayout:绝对布局
链接:android---AbsoluteLayout(绝对布局)详解
GridLayout:网格布局
链接:android---GridLayout(网格布局)详解
布局使用总结:
普遍的用法是:使用LinearLayout的weight属性 +RelativeLayout(相对布局)来进行布局,因为这样可以
解决屏幕的自适应问题
所谓的自适应问题就是:比如你的一个界面,在一台手机上是居中的,但是换了一部手机后组件就乱套了,或者拉伸
变形等!当然其他布局也有必要进行学习!!!
三种提示方式:
对话框:AlertDialog:
链接:对话框的父类(AlertDialog)
Toast(土司)和Notification(状态栏)
链接: Toast和Notification
电话拨号器的完整实现:
在前面main.xml布局的基础上,在MainActivity中添加一些代码后:
plaincopy
- package example.jay.com.myfirstapplication;
- import android.app.Activity;
- import android.content.Intent;
- import android.net.Uri;
- import android.os.Bundle;
- import android.view.View;
- import android.widget.Button;
- import android.widget.EditText;
- public class MyActivity extends Activity {
- private EditText editnum;
- private Button btncall;
- @Override
- protected void onCreate(Bundle savedInstanceState) {
- super.onCreate(savedInstanceState);
- setContentView(R.layout.activity_my);
- //①组件实例化
- editnum = (EditText)findViewById(R.id.editnum);
- btncall = (Button)findViewById(R.id.btncall);
- //为拨打按钮设置点击事件:
- btncall.setOnClickListener(new View.OnClickListener() {
- @Override
- public void onClick(View v) {
- //获得编辑框中的号码值:
- String mobile = editnum.getText().toString();
- Intent it = new Intent();
- //为意图添加一个行为:拨打电话,并且把电话号码写入it中
- it.setAction("android.intent.action.CALL");
- it.setData(Uri.parse("tel:"+mobile));
- //启动另一个Activity
- startActivity(it);
- }
- });
- }
- }
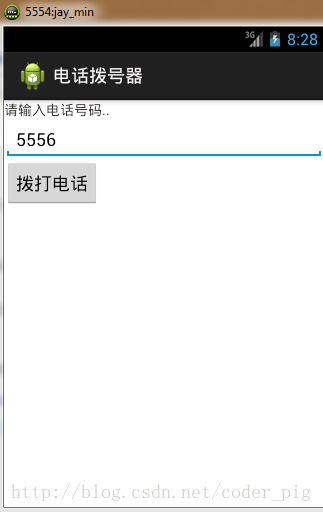
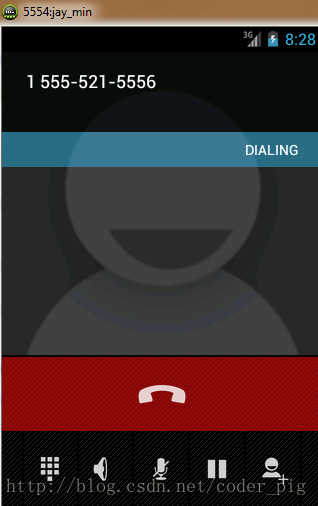
运行截图:
需要我们另外启动一个虚拟机:

- 文章2321
- 用户1336
- 访客12068830
七分示人,三分藏己。