通过应用程序内置资源实现换肤,典型的应用为QQ空间中换肤的实现. 应用场景为: 应用一般不大,且页面较少,风格相对简单,一般只用实现部分资源或者只用实现背景的更换. 此种换肤方式实现的思路: 1. 把几套皮肤放在res/drawable目录里,然后用SharedPreferences来记录当前皮肤的资源id.然后在程序启动时加载Activity背景。 2. 主要的实现在皮肤管理器SkinManager类中. 将皮肤资源的ID加入集合中. 由该类同一调度皮肤更换,如初始化皮肤,获取当前皮肤符号以及具体的对应资源的更换皮肤.
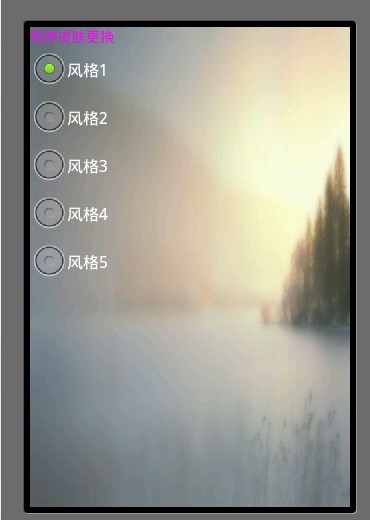
接下来看一下效果图:
内置皮肤的实现相对比较简单,下面直接上代码:
AndroidMainfest.xml
main.xml
皮肤管理器:
就这样,通过程序内置皮肤的基本功能完成了. 若想在自己的应用中实现,仍需注意以下几点(实现起来并不复杂,此处不再写具体实现): 1. 实现多个activity的更换皮肤. 需要利用自定义MyApplication类,继承自Application. 并加入activity的集合属性.用于存储应用所有的activity 修改SkinManager,在更换皮肤时,从application中取出该集合,进行遍历并更换皮肤
2. 可以优化用户体验,通过导航栏方式进入更换皮肤界面,并可以加入预览功能,当确定修改配置后,才完成更换皮肤功能. 3. 加入style.theme等资源,实现更加复杂的皮肤更换. 具体实现同更换背景.
接下来看一下效果图:
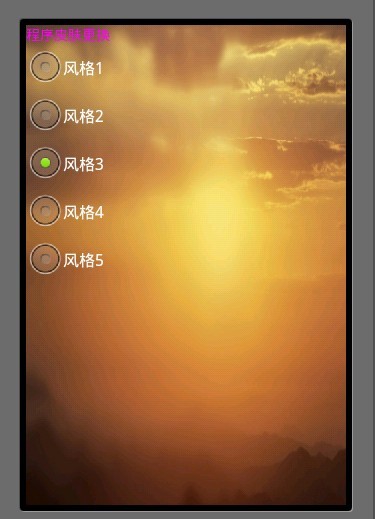
内置皮肤的实现相对比较简单,下面直接上代码:
AndroidMainfest.xml
<?xml version="1.0" encoding="utf-8"?>
<manifest xmlns:android="http://schemas.android.com/apk/res/android"
    package="com.tony.skindemo"
    android:versionCode="1"
    android:versionName="1.0" >
    <uses-sdk android:minSdkVersion="8" />
    <application
        android:icon="@drawable/ic_launcher"
        android:label="@string/app_name" >
        <activity
            android:label="@string/app_name"
            android:name="com.tony.skindemo.SkinDemoActivity" >
            <intent-filter >
                <action android:name="android.intent.action.MAIN" />
                <category android:name="android.intent.category.LAUNCHER" />
            </intent-filter>
        </activity>


    </application>
</manifest> 布局文件:main.xml
<?xml version="1.0" encoding="utf-8"?>
<LinearLayout xmlns:android="http://schemas.android.com/apk/res/android"
    android:layout_width="fill_parent"
    android:layout_height="fill_parent"
    android:orientation="vertical" >
    <TextView
        android:textColor="#ff00ff"
        android:text="程序皮肤更换"
        android:layout_width="fill_parent"
        android:layout_height="wrap_content" />
<RadioGroup
        android:id="@+id/skin_options"
        android:layout_width="fill_parent"
        android:layout_height="wrap_content"
         >
        <RadioButton
            android:layout_weight="1"
            android:id="@+id/radioButton1"
            android:layout_width="wrap_content"
            android:layout_height="wrap_content"
            android:text="风格1" />
        <RadioButton
            android:layout_weight="1"
            android:id="@+id/radioButton2"
            android:layout_width="wrap_content"
            android:layout_height="wrap_content"
            android:text="风格2" />
        <RadioButton
            android:layout_weight="1"
            android:id="@+id/radioButton3"
            android:layout_width="wrap_content"
            android:layout_height="wrap_content"
            android:text="风格3" />
        <RadioButton
            android:layout_weight="1"
            android:id="@+id/radioButton4"
            android:layout_width="wrap_content"
            android:layout_height="wrap_content"
            android:text="风格4" />
        <RadioButton
            android:layout_weight="1"
            android:id="@+id/radioButton5"
            android:layout_width="wrap_content"
            android:layout_height="wrap_content"
            android:text="风格5" />
    </RadioGroup>
</LinearLayout>
程序主Activity package com.tony.skindemo;
import android.app.Activity; import android.os.Bundle; import android.view.MotionEvent; import android.view.Window; import android.view.WindowManager; import android.widget.RadioButton; import android.widget.RadioGroup; import android.widget.RadioGroup.OnCheckedChangeListener;
public class SkinDemoActivity extends Activity {
private SkinSettingManager mSettingManager; private RadioButton radioButton1; private RadioButton radioButton2; private RadioButton radioButton3; private RadioButton radioButton4; private RadioButton radioButton5;
@Override public void onCreate(Bundle savedInstanceState) { super.onCreate(savedInstanceState);
// 取消标题栏 requestWindowFeature(Window.FEATURE_NO_TITLE); // 完成窗体的全屏显示 // 取消掉状态栏 getWindow().setFlags(WindowManager.LayoutParams.FLAG_FULLSCREEN, WindowManager.LayoutParams.FLAG_FULLSCREEN);
setContentView(R.layout.main); // 初始化皮肤 mSettingManager = new SkinSettingManager(this); mSettingManager.initSkins();
//通过单选按钮设置皮肤(可自定义更换的方式,如导航栏,也可以加上预览功能,此处不再实现) radioButton1 = (RadioButton) findViewById(R.id.radioButton1); radioButton2 = (RadioButton) findViewById(R.id.radioButton2); radioButton3 = (RadioButton) findViewById(R.id.radioButton3); radioButton4 = (RadioButton) findViewById(R.id.radioButton4); radioButton5 = (RadioButton) findViewById(R.id.radioButton5); RadioGroup radioGroup = (RadioGroup) findViewById(R.id.skin_options); radioGroup.setOnCheckedChangeListener(new OnCheckedChangeListener() {
@Override public void onCheckedChanged(RadioGroup group, int checkedId) {
switch (checkedId) { case R.id.radioButton1: mSettingManager.changeSkin(1); break;
case R.id.radioButton2: mSettingManager.changeSkin(2); break; case R.id.radioButton3: mSettingManager.changeSkin(3); break; case R.id.radioButton4: mSettingManager.changeSkin(4); break; case R.id.radioButton5: mSettingManager.changeSkin(5); break; default: break; } } }); }
// 这里为了简单实现,实现换肤 public boolean onTouchEvent(MotionEvent event) { mSettingManager.toggleSkins(); return super.onTouchEvent(event); }
}
皮肤管理器:
package com.tony.skindemo;


import android.app.Activity;
import android.content.SharedPreferences;
/**
 * 皮肤管理器
 * @author tony
 *
 */
public class SkinSettingManager {

	public final static String SKIN_PREF = "skinSetting";

	public SharedPreferences skinSettingPreference;

	private int[] skinResources = { R.drawable.default_wallpaper,
			R.drawable.wallpaper_c,R.drawable.wallpaper_d,R.drawable.wallpaper_f,
			R.drawable.wallpaper_g
	};

	private Activity mActivity;


	public SkinSettingManager(Activity activity) {
		this.mActivity = activity;
		skinSettingPreference = mActivity.getSharedPreferences(SKIN_PREF, 3);
	}

	/**
	 * 获取当前程序的皮肤序号
	 *
	 * @return
	 */
	public int getSkinType() {
		String key = "skin_type";
		return skinSettingPreference.getInt(key, 0);
	}
	/**
	 * 把皮肤序号写到全局设置里去
	 *
	 * @param j
	 */
	public void setSkinType(int j) {
		SharedPreferences.Editor editor = skinSettingPreference.edit();
		String key  = "skin_type";

		editor.putInt(key, j);
		editor.commit();
	}

	/**
	 * 获取当前皮肤的背景图资源id
	 *
	 * @return
	 */
	public int getCurrentSkinRes() {
		int skinLen = skinResources.length;
		int getSkinLen = getSkinType();
		if(getSkinLen >= skinLen){
			getSkinLen = 0;
		}

		return skinResources[getSkinLen];
	}

	public void toggleSkins(){

		int skinType = getSkinType();
		if(skinType == skinResources.length - 1){
			skinType = 0;
		}else{
			skinType ++;
		}
		setSkinType(skinType);
		mActivity.getWindow().setBackgroundDrawable(null);
		try {
			mActivity.getWindow().setBackgroundDrawableResource(getCurrentSkinRes());
		} catch (Throwable e) {
			e.printStackTrace();
		}


	}

	/**
	 * 用于初始化皮肤
	 */
	public void initSkins(){
		mActivity.getWindow().setBackgroundDrawableResource(getCurrentSkinRes());
	}
	/**
	 * 随即切换一个背景皮肤
	 */
	public void changeSkin(int id) {

		setSkinType(id);
		mActivity.getWindow().setBackgroundDrawable(null);
		try {
			mActivity.getWindow().setBackgroundDrawableResource(getCurrentSkinRes());
		} catch (Throwable e) {
			e.printStackTrace();
		}
	}
}
就这样,通过程序内置皮肤的基本功能完成了. 若想在自己的应用中实现,仍需注意以下几点(实现起来并不复杂,此处不再写具体实现): 1. 实现多个activity的更换皮肤. 需要利用自定义MyApplication类,继承自Application. 并加入activity的集合属性.用于存储应用所有的activity 修改SkinManager,在更换皮肤时,从application中取出该集合,进行遍历并更换皮肤
2. 可以优化用户体验,通过导航栏方式进入更换皮肤界面,并可以加入预览功能,当确定修改配置后,才完成更换皮肤功能. 3. 加入style.theme等资源,实现更加复杂的皮肤更换. 具体实现同更换背景.
收藏的用户(0) X
正在加载信息~
推荐阅读
最新回复 (0)
站点信息
- 文章2324
- 用户1338
- 访客12493873
每日一句
The door closed on the story just now.
门合上了刚才的故事。
门合上了刚才的故事。