本站另外篇就是这个的源码。opencv 写的 OCR
我在这里小结一下,我把这个算法优化了一下,并未用到下面提到的preprocessing函数,这个函数应该就是找轮廓。我粗看是这么回事。openCV其实是自带有找轮廓的函数的——cvFindContours
我的方法是,先用系统二值化,然后找轮廓。最后把轮廓进行矩阵配上最近邻分类器识别数字,识别常规数字基本上一套样本识别率100%(目前没出错过),对于手写的,可能需要多个样本。像下面例子中提到的。
basic painter 和 the basic pattern recognition and classification with openCV 两个教程。
在一个典型的模式识别分类器里,包括三个模块:
特征提取(Feature extraction):在这个模块我们转换我们处理后的图像为一个特征向量以便于分类,它可能是像素矩阵转换成向量或者获取轮廓编码链的数据表示。
分类模块获取特征向量,并训练我们的系统或者说使用一个分类方法(比如knn)把输入的特征向量分类。
这个基础光学字符识别的流程图如下:
现在我们有由图片组成的一个训练集和一个测试集来训练和测试我们的分类器(knn)。
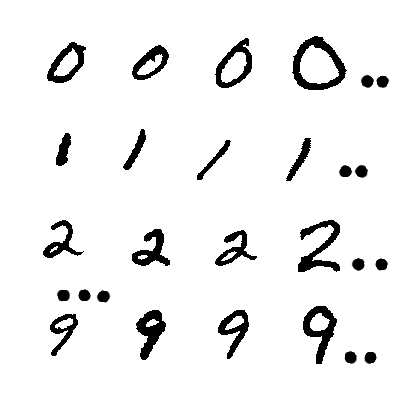
我们有1000张手写数字的图片,每个数字100张。我们使用每个数字的50张图片来训练,另外50张来测试我们的系统。
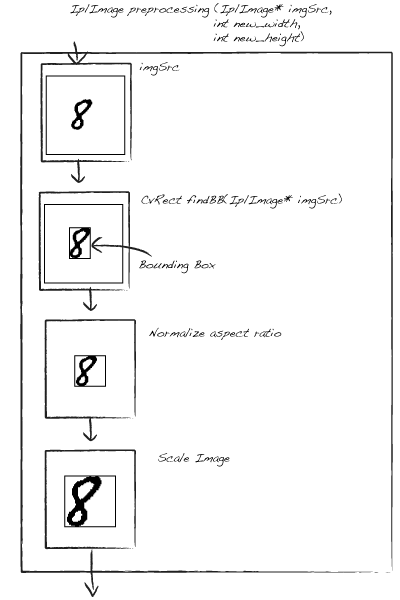
接下来我们要做的第一个工作就是对所有训练集的图片预处理,为了完成它我们创建一个预处理函数。在这个函数中,我们输入一张图片和我们想要它在处理后得到的新的长和宽,这个函数讲返回一个标准大小的带有边框的图片。你可以看到更多清楚的处理流程:
预处理代码:
我们使用basicOCR类的getData函数来创建训练数据和训练类,这个函数获取所有在OCR文件夹下的图片来创建训练数据,OCR文件夹中的每个类是一个文件夹,其中每个文件都是名为cnn.pbm的pbm文件,c是类(0,1,...,9)中的一个,nn是图片的编号(00,01,...,99)。
我们得到的每张图片都是预处理过的了,然后他们将转换成特征向量里的数据以便我们使用。
basicOCR.cpp 获取数据代码:
在处理并且得到训练数据和类以后我们用我们的模型训练这些数据,在这个例子中我们用knn方法:
现在我们可以测试我们的模型了,并且我们可以使用测试的结果来和其它我们使用的方法比较,又或者我们减小图片大小等等。这里是在我们的basicOCR类里创建的一个函数,测试函数。
这个函数获取其它500个样本并且用我们选择的方法分类,再检验得到的结果。
test函数使用了分类函数,获取图片,处理图片,得到特征向量并且用knn类的find_nearest函数对其分类。下面
这个函数我们用来分类输入的用户图片:
所有的工作或者训练和测试都在basicOCR类里,当我们创建一个basicOCR的实例时只需要调用classify函数来分类我们输入的图片。然后我们使用我们之前在其它教程里创建的简单的Painter来给用户交互绘出一张图片并且分类它。
译者注:
1.knn,即K最邻近结点算法(k-Nearest Neighbor algorithm),最简单的机器学习算法之一,简单说就是在特征空间里找到周围最近的k个样本,如果这k个样本中的大多数属于某个类,则该样本也属于这个类。
2.painter,GUI编程中的绘图接口,也就是完成绘制和显示图像的功能。
我在这里小结一下,我把这个算法优化了一下,并未用到下面提到的preprocessing函数,这个函数应该就是找轮廓。我粗看是这么回事。openCV其实是自带有找轮廓的函数的——cvFindContours
我的方法是,先用系统二值化,然后找轮廓。最后把轮廓进行矩阵配上最近邻分类器识别数字,识别常规数字基本上一套样本识别率100%(目前没出错过),对于手写的,可能需要多个样本。像下面例子中提到的。
basic painter 和 the basic pattern recognition and classification with openCV 两个教程。
在一个典型的模式识别分类器里,包括三个模块:
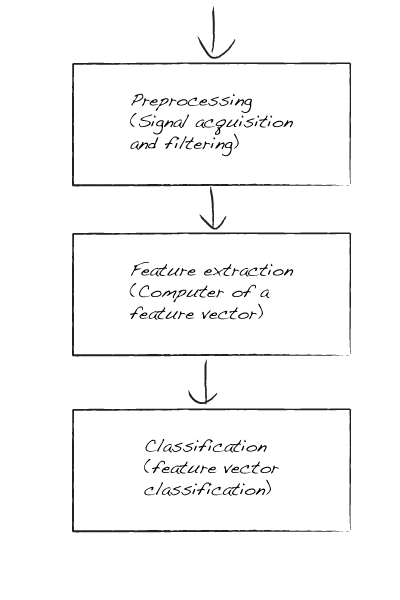
预处理(信号获取和滤波)
特征提取(特征向量的计算)
分类(特征向量的分类)
预处理(Preprocessing):在这个模块我们将要处理我们输入的图片,比如大小标准化,彩色图像灰度化等等。特征提取(Feature extraction):在这个模块我们转换我们处理后的图像为一个特征向量以便于分类,它可能是像素矩阵转换成向量或者获取轮廓编码链的数据表示。
分类模块获取特征向量,并训练我们的系统或者说使用一个分类方法(比如knn)把输入的特征向量分类。
这个基础光学字符识别的流程图如下:
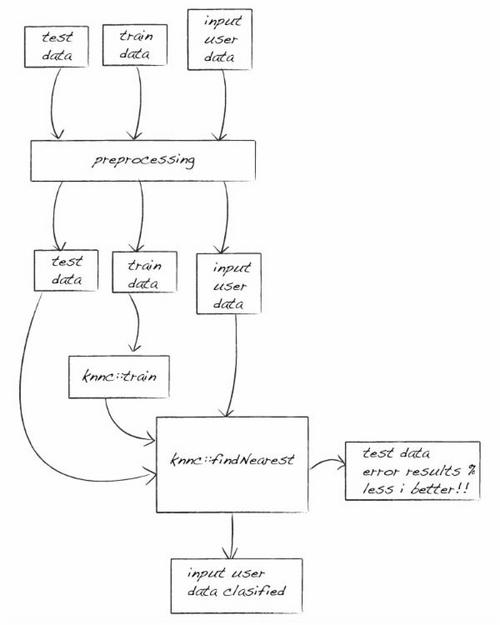
现在我们有由图片组成的一个训练集和一个测试集来训练和测试我们的分类器(knn)。
我们有1000张手写数字的图片,每个数字100张。我们使用每个数字的50张图片来训练,另外50张来测试我们的系统。
接下来我们要做的第一个工作就是对所有训练集的图片预处理,为了完成它我们创建一个预处理函数。在这个函数中,我们输入一张图片和我们想要它在处理后得到的新的长和宽,这个函数讲返回一个标准大小的带有边框的图片。你可以看到更多清楚的处理流程:
预处理代码:
void findX(IplImage * imgSrc, int * min, int * max) {
    int i;
    int minFound = 0;
    CvMat data;
    CvScalar maxVal = cvRealScalar(imgSrc - > width * 255);
    CvScalar val = cvRealScalar(0);
    //For each col sum, if sum < width*255 then we find the min
    //then continue to end to search the max, if sum< width*255 then is new max
    for (i = 0; i < imgSrc - > width; i++) {
        cvGetCol(imgSrc, & data, i);
        val = cvSum( & data);
        if (val.val[0] < maxVal.val[0]) { *
            max = i;
            if (!minFound) { *
                min = i;
                minFound = 1;
            }
        }
    }
}
void findY(IplImage * imgSrc, int * min, int * max) {
    int i;
    int minFound = 0;
    CvMat data;
    CvScalar maxVal = cvRealScalar(imgSrc - > width * 255);
    CvScalar val = cvRealScalar(0);
    //For each col sum, if sum < width*255 then we find the min
    //then continue to end to search the max, if sum< width*255 then is new max
    for (i = 0; i < imgSrc - > height; i++) {
        cvGetRow(imgSrc, & data, i);
        val = cvSum( & data);
        if (val.val[0] < maxVal.val[0]) { *
            max = i;
            if (!minFound) { *
                min = i;
                minFound = 1;
            }
        }
    }
}
CvRect findBB(IplImage * imgSrc) {
    CvRect aux;
    int xmin, xmax, ymin, ymax;
    xmin = xmax = ymin = ymax = 0;
    findX(imgSrc, & xmin, & xmax);
    findY(imgSrc, & ymin, & ymax);
    aux = cvRect(xmin, ymin, xmax - xmin, ymax - ymin);
    //printf("BB: %d,%d - %d,%d\n", aux.x, aux.y, aux.width, aux.height);
    return aux;
}
IplImage preprocessing(IplImage * imgSrc, int new_width, int new_height) {
    IplImage * result;
    IplImage * scaledResult;
    CvMat data;
    CvMat dataA;
    CvRect bb; //bounding box
    CvRect bba; //boundinb box maintain aspect ratio
    //Find bounding box
    bb = findBB(imgSrc);
    //Get bounding box data and no with aspect ratio, the x and y can be corrupted
    cvGetSubRect(imgSrc, & data, cvRect(bb.x, bb.y, bb.width, bb.height));
    //Create image with this data with width and height with aspect ratio 1
    //then we get highest size betwen width and height of our bounding box
    int size = (bb.width > bb.height) ? bb.width : bb.height;
    result = cvCreateImage(cvSize(size, size), 8, 1);
    cvSet(result, CV_RGB(255, 255, 255), NULL);
    //Copy de data in center of image
    int x = (int) floor((float)(size - bb.width) / 2.0 f);
    int y = (int) floor((float)(size - bb.height) / 2.0 f);
    cvGetSubRect(result, & dataA, cvRect(x, y, bb.width, bb.height));
    cvCopy( & data, & dataA, NULL);
    //Scale result
    scaledResult = cvCreateImage(cvSize(new_width, new_height), 8, 1);
    cvResize(result, scaledResult, CV_INTER_NN);
    //Return processed data
    return *scaledResult;
}
我们使用basicOCR类的getData函数来创建训练数据和训练类,这个函数获取所有在OCR文件夹下的图片来创建训练数据,OCR文件夹中的每个类是一个文件夹,其中每个文件都是名为cnn.pbm的pbm文件,c是类(0,1,...,9)中的一个,nn是图片的编号(00,01,...,99)。
我们得到的每张图片都是预处理过的了,然后他们将转换成特征向量里的数据以便我们使用。
basicOCR.cpp 获取数据代码:
void basicOCR::getData() {
    IplImage * src_image;
    IplImage prs_image;
    CvMat row, data;
    char file[255];
    int i, j;
    for (i = 0; i < classes; i++) {
        for (j = 0; j < train_samples; j++) {
            //Load file
            if (j < 10)
                sprintf(file, "%s%d/%d0%d.pbm", file_path, i, i, j);
            else
                sprintf(file, "%s%d/%d%d.pbm", file_path, i, i, j);
            src_image = cvLoadImage(file, 0);
            if (!src_image) {
                printf("Error: Cant load image %s\n", file);
                //exit(-1);
            }
            //process file
            prs_image = preprocessing(src_image, size, size);
            //Set class label
            cvGetRow(trainClasses, & row, i * train_samples + j);
            cvSet( & row, cvRealScalar(i));
            //Set data
            cvGetRow(trainData, & row, i * train_samples + j);
            IplImage * img = cvCreateImage(cvSize(size, size), IPL_DEPTH_32F, 1);
            //convert 8 bits image to 32 float image
            cvConvertScale( & prs_image, img, 0.0039215, 0);
            cvGetSubRect(img, & data, cvRect(0, 0, size, size));
            CvMat row_header, * row1;
            //convert data matrix sizexsize to vecor
            row1 = cvReshape( & data, & row_header, 0, 1);
            cvCopy(row1, & row, NULL);
        }
    }
}
在处理并且得到训练数据和类以后我们用我们的模型训练这些数据,在这个例子中我们用knn方法:
knn=new CvKNearest( trainData, trainClasses, 0, false, K );
现在我们可以测试我们的模型了,并且我们可以使用测试的结果来和其它我们使用的方法比较,又或者我们减小图片大小等等。这里是在我们的basicOCR类里创建的一个函数,测试函数。
这个函数获取其它500个样本并且用我们选择的方法分类,再检验得到的结果。
void basicOCR::test() {
    IplImage * src_image;
    IplImage prs_image;
    CvMat row, data;
    char file[255];
    int i, j;
    int error = 0;
    int testCount = 0;
    for (i = 0; i < classes; i++) {
        for (j = 50; j < 50 + train_samples; j++) {
            sprintf(file, "%s%d/%d%d.pbm", file_path, i, i, j);
            src_image = cvLoadImage(file, 0);
            if (!src_image) {
                printf("Error: Cant load image %s\n", file);
                //exit(-1);
            }
            //process file
            prs_image = preprocessing(src_image, size, size);
            float r = classify( & prs_image, 0);
            if ((int) r != i)
                error++;
            testCount++;
        }
    }
    float totalerror = 100 * (float) error / (float) testCount;
    printf("System Error: %.2f%%\n", totalerror);
}
test函数使用了分类函数,获取图片,处理图片,得到特征向量并且用knn类的find_nearest函数对其分类。下面
这个函数我们用来分类输入的用户图片:
float basicOCR::classify(IplImage * img, int showResult) {
    IplImage prs_image;
    CvMat data;
    CvMat * nearest = cvCreateMat(1, K, CV_32FC1);
    float result;
    //process file
    prs_image = preprocessing(img, size, size);
    //Set data
    IplImage * img32 = cvCreateImage(cvSize(size, size), IPL_DEPTH_32F, 1);
    cvConvertScale( & prs_image, img32, 0.0039215, 0);
    cvGetSubRect(img32, & data, cvRect(0, 0, size, size));
    CvMat row_header, * row1;
    row1 = cvReshape( & data, & row_header, 0, 1);
    result = knn - > find_nearest(row1, K, 0, 0, nearest, 0);
    int accuracy = 0;
    for (int i = 0; i < K; i++) {
        if (nearest - > data.fl[i] == result)
            accuracy++;
    }
    float pre = 100 * ((float) accuracy / (float) K);
    if (showResult == 1) {
        printf("|\t%.0f\t| \t%.2f%%  \t| \t%d of %d \t| \n", result, pre, accuracy, K);
        printf(" ---------------------------------------------------------------\n");
    }
    return result;
}
所有的工作或者训练和测试都在basicOCR类里,当我们创建一个basicOCR的实例时只需要调用classify函数来分类我们输入的图片。然后我们使用我们之前在其它教程里创建的简单的Painter来给用户交互绘出一张图片并且分类它。
译者注:
1.knn,即K最邻近结点算法(k-Nearest Neighbor algorithm),最简单的机器学习算法之一,简单说就是在特征空间里找到周围最近的k个样本,如果这k个样本中的大多数属于某个类,则该样本也属于这个类。
2.painter,GUI编程中的绘图接口,也就是完成绘制和显示图像的功能。
收藏的用户(0) X
正在加载信息~
推荐阅读
最新回复 (0)
站点信息
- 文章2324
- 用户1338
- 访客12501083
每日一句
The scent of green lime cuts through the stifling air.
青柠的气味切开沉闷。
青柠的气味切开沉闷。