最终效果
本例的最终效果如下:这就是本例的最终效果,我们将实现一个虚拟游戏方向摇杆,模拟摇杆操作。此外我们将为它写一个监听器实现摇动方向和速度等数据返回(本例中只实现了监听部分代码,数据读者可以自行加上)。
基本思路
首先依然是上一篇所讲述的那几个步骤,包括自定义XML属性,引入属性,测量和绘制几个部分(没看过上一篇文章的点击博客阅读或者查看博主的简书),除了这几个部分外我们还需要重写onTouchEvent()方法进行View事件处理和利用回调写好监听器。整体思路就是这样,看起来不难,实际操作起来陷阱多多。具体实现
前期准备
新建value/attrs.xml,在XML中声明并引入以下属性:这次我们只需要两个属性,小圆颜色和大圆颜色。然后新建一个java文件,继承View命名为NavController,在java中重写构造方法并且将XML属性导入,新建画笔对象,为之设置好属性。关键代码如下:
public NavController(Context context, AttributeSet attrs) {
    super(context, attrs);
    TypedArray ta = getResources().obtainAttributes(attrs,R.styleable.NavController);
    innerColor = ta.getColor(R.styleable.NavController_InnerColor,INNER_COLOR_DEFAULT);
    outerColor = ta.getColor(R.styleable.NavController_OuterColor,OUTER_COLOR_DEFAULT);
    ta.recycle();
    OUTER_WIDTH_SIZE = dip2px(context,125.0f);
    OUTER_HEIGHT_SIZE = dip2px(context,125.0f);
    outerPaint = new Paint();
    innerPaint = new Paint();
    outerPaint.setColor(outerColor);
    outerPaint.setStyle(Paint.Style.FILL_AND_STROKE);
    innerPaint.setColor(innerColor);
    innerPaint.setStyle(Paint.Style.FILL_AND_STROKE);
上面的OUTER_WIDTH_SIZE和OUTER_HEIGHT_SIZE分别是大圆在没有设置具体值下的默认大小,我们使用dip2px()方法将我们熟练掌握的dip转化为java逻辑唯一承认的px单位,具体实现: public static int dip2px(Context context, float dpValue){
final float scale = context.getResources().getDisplayMetrics().density;
return (int) (dpValue*scale +0.5f);
}
这样就做好了前期准备工作,由于上篇讲述过关于onMeasure和onDraw的相关理解和用法,这里就简单阐述,将这两块写在同一个部分。 测量绘制
测量时我们分别对三种模式下的尺寸进行不同的处理,分别是返回父View给的值加上padding值(EXACTLY),返回大圆的宽高(UNSPECIFIED)和返回大圆宽高与父View允许最大值之间的最小值(AT_MOST)。然后回调onSizeChanged()中取出实际宽高值,利用该值进行View绘制。onDraw中主要是确定了两个圆的半径(大圆半径为去除padding的宽高一半下四种情况的最小值,参照代码看这句话。小圆半径为大圆的一半)和绘制了两个圆。此外小圆的中心点我们现在onSizeChanged中进行了赋值,注意小圆中心点坐标值的改变是本例的关键,通过改变它来实现效果。这样我们就把View的显示区域和View的基本形状定义完毕。@Override
protected void onMeasure(int widthMeasureSpec, int heightMeasureSpec) {
super.onMeasure(widthMeasureSpec, heightMeasureSpec);
int width = measureWidth(widthMeasureSpec);
int height = measureHeight(heightMeasureSpec);
setMeasuredDimension(width,height);
}
private int measureWidth(int widthMeasureSpec) {
int widthMode = MeasureSpec.getMode(widthMeasureSpec);
int widthVal = MeasureSpec.getSize(widthMeasureSpec);
//处理三种模式
if(widthMode==MeasureSpec.EXACTLY){
return widthVal+getPaddingLeft()+getPaddingRight();
}else if(widthMode==MeasureSpec.UNSPECIFIED){
return OUTER_WIDTH_SIZE;
}else{
return Math.min(OUTER_WIDTH_SIZE,widthVal);
}
}
private int measureHeight(int heightMeasureSpec) {
int heightMode = MeasureSpec.getMode(heightMeasureSpec);
int heightVal = MeasureSpec.getSize(heightMeasureSpec);
//处理三种模式
if(heightMode==MeasureSpec.EXACTLY){
return heightVal+getPaddingTop()+getPaddingBottom();
}else if(heightMode==MeasureSpec.UNSPECIFIED){
return OUTER_HEIGHT_SIZE;
}else{
return Math.min(OUTER_HEIGHT_SIZE,heightVal);
}
}
@Override
protected void onSizeChanged(int w, int h, int oldw, int oldh) {
super.onSizeChanged(w, h, oldw, oldh);
realWidth = w;
realHeight = h;
innerCenterX = realWidth/2;
innerCenterY = realHeight/2;
}
@Override
protected void onDraw(Canvas canvas) {
super.onDraw(canvas);
outRadius = Math.min(Math.min(realWidth/2-getPaddingLeft(),realWidth/2-getPaddingRight()),Math.min(realHeight/2-getPaddingTop(),realHeight/2-getPaddingBottom()));
//画外部圆
canvas.drawCircle(realWidth/2,realHeight/2,outRadius,outerPaint);
//内部圆
innerRedius = outRadius*0.5f;
canvas.drawCircle(innerCenterX,innerCenterY,innerRedius,innerPaint);
}
View事件处理
下面这一步是实现效果的关键步骤。上面我们已经绘制出了基本的形状,但是View触摸后没有任何效果。这一步正是实现View触摸的效果。对于这一步的理解可能有一定的难度,读者应该反复揣摩其中涉及到基本的三角函数和圆的方程的计算,如果不明白这两部分数学知识的最好先去翻一翻课本……定义一些炫酷的View大都基于数学知识的基础上。我们要重写onTouchEvent()方法,先放上这部分代码:@Override
public boolean onTouchEvent(MotionEvent event) {
if(event.getAction()==MotionEvent.ACTION_DOWN){
changeInnerCirclePosition(event);
}
if(event.getAction()==MotionEvent.ACTION_MOVE){
changeInnerCirclePosition(event);
Log.i("TAG","MOVED");
}
if(event.getAction()==MotionEvent.ACTION_UP){
innerCenterX = realWidth/2;
innerCenterY = realHeight/2;
invalidate();
}
return true;
}
可以看到,上面的对onTouchEvent()方法的重写处理了三种情况下的逻辑:用户在View的区域按下、移动和离开三种情况,当手指离开时我们把内圆的中心点移动到View的最中间(恢复初始状态),然后刷新,当按下或者移动时调用changeInnerCirclePosition(event)方法,这个方法用于对内圆进行处理让内圆根据手指位置判断调整位置。下面看看changeInnerCirclePosition()方法。
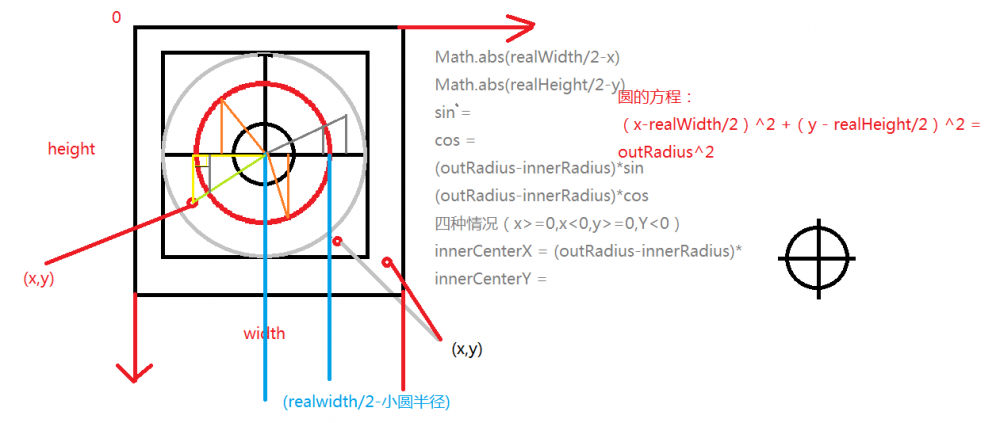
private void changeInnerCirclePosition(MotionEvent e) {
//圆的方程:(x-realWidth/2)^2 +(y - realHeight/2)^2 <= outRadius^2
//第一步,确定有效的触摸点集
float X = e.getX();
float Y = e.getY();
if(mCallBack!=null){
mCallBack.onNavAndSpeed(X,Y);
}
boolean isPointInOutCircle = Math.pow(X-realWidth/2,2) +Math.pow(Y-realHeight/2,2)<=Math.pow(outRadius,2);
if(isPointInOutCircle){
Log.i("TAG","inCircle");
//两种情况:小圆半径
boolean isPointInFree = Math.pow(X-realWidth/2,2) +Math.pow(Y-realHeight/2,2)<=Math.pow(outRadius-innerRedius,2);
if(isPointInFree){
innerCenterX = X;
innerCenterY = Y;
}else{
//处理限制区域,这部分使用触摸点与中心点与外圆方程交点作为内圆的中心点
//使用近似三角形来确定这个点
//求出触摸点,触摸点垂足和中心点构成的直角三角形(pointTri)的直角边长
float pointTriX = Math.abs(realWidth/2-X);//横边
float pointTriY = Math.abs(realHeight/2-Y);//竖边
float pointTriZ = (float) Math.sqrt((Math.pow(pointTriX,2)+Math.pow(pointTriY,2)));
float TriSin = pointTriY/pointTriZ;
float TriCos = pointTriX/pointTriZ;
//求出在圆环上的三角形的两个直角边的长度
float limitCircleTriY = (outRadius-innerRedius)*TriSin;
float limitCircleTriX = (outRadius-innerRedius)*TriCos;
//确定内圆中心点的位置,分四种情况
if(X>=realWidth/2 && Y>=realHeight/2){
innerCenterX = realWidth/2+limitCircleTriX;
innerCenterY = realHeight/2+limitCircleTriY;
}else if(X=realHeight/2){
innerCenterX = realWidth/2-limitCircleTriX;
innerCenterY= realHeight/2+limitCircleTriY;
}else if(X>=realWidth/2 && Y 这个方法很长,上面我已经说了,它是用于让内圆根据用户的手指的位置进行位置变动的关键。下面一步一步剖析。附上本人实现过程中绘制的图片。建议在实现一些逻辑时可以绘图帮助记录和启发思维。
第一步,我们先获取有效的触摸范围(根据个人实际情况而定)
本例中博主不使用希望用户在点击大圆外面的范围时内圆还跟着运动,所以要先确定一下触摸的有效范围。
使用圆的方程来判断用户的触摸点是否在大圆内,代码: boolean isPointInOutCircle = Math.pow(X-realWidth/2,2) +Math.pow(Y-realHeight/2,2)<=Math.pow(outRadius,2); 。如果不在大圆内不执行逻辑,在大圆内则进行下一步判断。
第二步,触摸点是否在自由域内?
这里博主使用了自由域这个词(好吧,自己扯的)。以大圆半径减去小圆半径后的值作为半径生成新的圆(命名为 限制圆 ,下面用到),我把下图中S1部分叫做自由域,S2为非自由域。
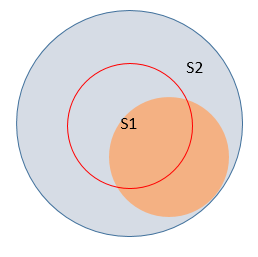
自由域有什么特点?就是当用户把触摸点落在自由域内我们小圆的中心点只要跟着触摸点的坐标就行了,没有任何限制;而当落在非自由域内时小圆的中心点就受到限制了。这里分成两部分讨论。对于自由域的处理见下面: if(isPointInFree){
innerCenterX = X;
innerCenterY = Y;
}
对于非自由域我们怎么处理呢?当用户触摸点落在非自由域时,我们把触摸点与限制圆作为小圆中心点的坐标,见下图展示:
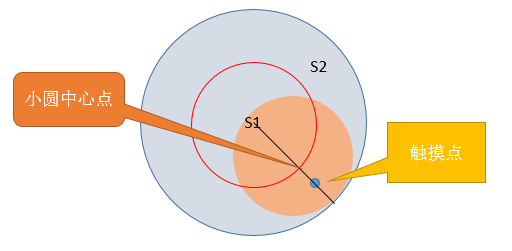
下面就是求解直线与圆的交点坐标的问题了(博主整整搞了一个小时……),只要解决这个问题即可,不过要注意这里的坐标与数学的坐标系略有不同,横轴为x向右,纵轴为y向下。我的处理方式见上面代码,主要利用相似三角形和三角函数的知识。具体注解上面有表述。这一步跟绘制往往表现了一个自定义View的质量高低。 监听器的构造
有了这个摇杆,最后就是为它实现返回数据的功能了,我们使用监听器来实现。(可以参考 利用Android回调机制对Dialog进行简单封装 关于回调监听的知识)先写好监听的回调接口, public interface OnNavAndSpeedListener{
public void onNavAndSpeed(float nav,float speed);
}
声明接口对象mCallBack,然后在需要回调返回数据的地方调用改接口中的方法: mCallBack.onNavAndSpeed(float nav,float speed) ,注意先判断mCallBack对象是否为null。然后使用 public void setOnNavAndSpeedListener(OnNavAndSpeedListener listener){
mCallBack = listener;
}
在Activity中让调用者新建接口并传入。Activity中具体使用如下: navController.setOnNavAndSpeedListener(new NavController.OnNavAndSpeedListener() {
@Override
public void onNavAndSpeed(float nav, float speed) {
Log.i("TAG",nav+speed+"");
}
});
这样就实现了速度和方向的返回,定制完了一个游戏摇杆。读者可以根据需求进行优化更改。 总结
本章借助实现游戏摇杆的例子回顾了自定义View的基本步骤和引入事件处理和监听器的相关实现,下面的文章将对ViewGroup一块开始动刀子学习。如果感觉对您有帮助可以关注本人博客或者简书。 附录:View具体代码
public class NavController extends View {
private int innerColor;
private int outerColor;
private final static int INNER_COLOR_DEFAULT = Color.parseColor("#d32f2f");
private final static int OUTER_COLOR_DEFAULT = Color.parseColor("#f44336");
private int OUTER_WIDTH_SIZE;
private int OUTER_HEIGHT_SIZE;
private int realWidth;//绘图使用的宽
private int realHeight;//绘图使用的高
private float innerCenterX;
private float innerCenterY;
private float outRadius;
private float innerRedius;
private Paint outerPaint;
private Paint innerPaint;
private OnNavAndSpeedListener mCallBack = null;
public interface OnNavAndSpeedListener{
public void onNavAndSpeed(float nav,float speed);
}
public NavController(Context context) {
this(context,null);
}
public NavController(Context context, AttributeSet attrs) {
super(context, attrs);
TypedArray ta = getResources().obtainAttributes(attrs,R.styleable.NavController);
innerColor = ta.getColor(R.styleable.NavController_InnerColor,INNER_COLOR_DEFAULT);
outerColor = ta.getColor(R.styleable.NavController_OuterColor,OUTER_COLOR_DEFAULT);
ta.recycle();
OUTER_WIDTH_SIZE = dip2px(context,125.0f);
OUTER_HEIGHT_SIZE = dip2px(context,125.0f);
outerPaint = new Paint();
innerPaint = new Paint();
outerPaint.setColor(outerColor);
outerPaint.setStyle(Paint.Style.FILL_AND_STROKE);
innerPaint.setColor(innerColor);
innerPaint.setStyle(Paint.Style.FILL_AND_STROKE);
}
@Override
    protected void onMeasure(int widthMeasureSpec, int heightMeasureSpec) {
        super.onMeasure(widthMeasureSpec, heightMeasureSpec);
        int width = measureWidth(widthMeasureSpec);
        int height = measureHeight(heightMeasureSpec);
        setMeasuredDimension(width,height);
    }
    private int measureWidth(int widthMeasureSpec) {
        int widthMode = MeasureSpec.getMode(widthMeasureSpec);
        int widthVal = MeasureSpec.getSize(widthMeasureSpec);
        //处理三种模式
        if(widthMode==MeasureSpec.EXACTLY){
            return widthVal+getPaddingLeft()+getPaddingRight();
        }else if(widthMode==MeasureSpec.UNSPECIFIED){
            return OUTER_WIDTH_SIZE;
        }else{
            return Math.min(OUTER_WIDTH_SIZE,widthVal);
        }
    }
    private int measureHeight(int heightMeasureSpec) {
        int heightMode = MeasureSpec.getMode(heightMeasureSpec);
        int heightVal = MeasureSpec.getSize(heightMeasureSpec);
        //处理三种模式
        if(heightMode==MeasureSpec.EXACTLY){
            return heightVal+getPaddingTop()+getPaddingBottom();
        }else if(heightMode==MeasureSpec.UNSPECIFIED){
            return OUTER_HEIGHT_SIZE;
        }else{
            return Math.min(OUTER_HEIGHT_SIZE,heightVal);
        }
    }
    @Override
    protected void onSizeChanged(int w, int h, int oldw, int oldh) {
        super.onSizeChanged(w, h, oldw, oldh);
        realWidth = w;
        realHeight = h;
        innerCenterX = realWidth/2;
        innerCenterY = realHeight/2;
    }
    @Override
    protected void onDraw(Canvas canvas) {
        super.onDraw(canvas);
        outRadius = Math.min(Math.min(realWidth/2-getPaddingLeft(),realWidth/2-getPaddingRight()),Math.min(realHeight/2-getPaddingTop(),realHeight/2-getPaddingBottom()));
        //画外部圆
        canvas.drawCircle(realWidth/2,realHeight/2,outRadius,outerPaint);
        //内部圆
        innerRedius = outRadius*0.5f;
        canvas.drawCircle(innerCenterX,innerCenterY,innerRedius,innerPaint);
    }
@Override
    public boolean onTouchEvent(MotionEvent event) {
        if(event.getAction()==MotionEvent.ACTION_DOWN){
            changeInnerCirclePosition(event);
        }
        if(event.getAction()==MotionEvent.ACTION_MOVE){
            changeInnerCirclePosition(event);
            Log.i("TAG","MOVED");
        }
        if(event.getAction()==MotionEvent.ACTION_UP){
            innerCenterX = realWidth/2;
            innerCenterY = realHeight/2;
            invalidate();
        }
        return true;
    }
private void changeInnerCirclePosition(MotionEvent e) {
//圆的方程:(x-realWidth/2)^2 +(y - realHeight/2)^2 <= outRadius^2
//第一步,确定有效的触摸点集
float X = e.getX();
float Y = e.getY();
if(mCallBack!=null){
mCallBack.onNavAndSpeed(X,Y);
}
boolean isPointInOutCircle = Math.pow(X-realWidth/2,2) +Math.pow(Y-realHeight/2,2)<=Math.pow(outRadius,2);
if(isPointInOutCircle){
Log.i("TAG","inCircle");
//两种情况:小圆半径
boolean isPointInFree = Math.pow(X-realWidth/2,2) +Math.pow(Y-realHeight/2,2)<=Math.pow(outRadius-innerRedius,2);
if(isPointInFree){
innerCenterX = X;
innerCenterY = Y;
}else{
//处理限制区域,这部分使用触摸点与中心点与外圆方程交点作为内圆的中心点
//使用近似三角形来确定这个点
//求出触摸点,触摸点垂足和中心点构成的直角三角形(pointTri)的直角边长
float pointTriX = Math.abs(realWidth/2-X);//横边
float pointTriY = Math.abs(realHeight/2-Y);//竖边
float pointTriZ = (float) Math.sqrt((Math.pow(pointTriX,2)+Math.pow(pointTriY,2)));
float TriSin = pointTriY/pointTriZ;
float TriCos = pointTriX/pointTriZ;
//求出在圆环上的三角形的两个直角边的长度
float limitCircleTriY = (outRadius-innerRedius)*TriSin;
float limitCircleTriX = (outRadius-innerRedius)*TriCos;
//确定内圆中心点的位置,分四种情况
if(X>=realWidth/2 && Y>=realHeight/2){
innerCenterX = realWidth/2+limitCircleTriX;
innerCenterY = realHeight/2+limitCircleTriY;
}else if(X=realHeight/2){
innerCenterX = realWidth/2-limitCircleTriX;
innerCenterY= realHeight/2+limitCircleTriY;
}else if(X>=realWidth/2 && Y 系列文章
Android自定义View系列(一)——打造一个爱心进度条
Android自定义View系列(二)——打造一个仿2K游戏摇杆
阅读原文