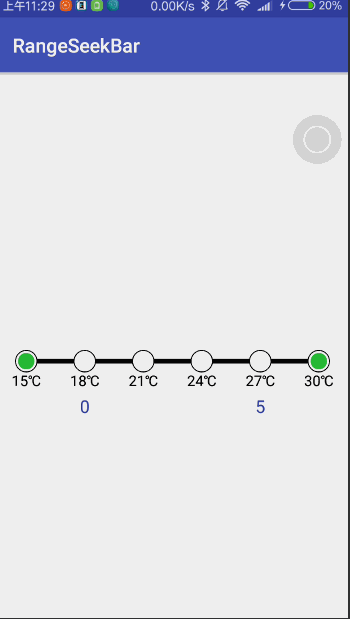
效果演示:
添加依赖库的步骤
1.项目的gradle文件内的做以下改动
allprojects {
        repositories {
            ...
            maven { url "https://jitpack.io" }
        }
    }
2.添加最新版本的依赖库,最新版本如右所示,修改末尾的版本即可(因为我有时候更新版本了会忘记修改readme)
dependencies {
            compile 'com.github.Brioal:BrioalSetting:1.0'
            ////例如上面最新版本是1.1,则只要把1.0改成1.1即可使用最新版本
    }
使用步骤:
1.xml布局文件
实际使用过程中发现如果与其他组件在一起,则滑动事件会实效,暂时没发现代码里面怎么解决,设置focus啥的都没用,暂时的解决办法是给组件添加一个父布局并且不包含其他组件即可,如下:
<LinearLayout
        android:id="@+id/layout"
android:layout_centerInParent="true"
        android:layout_width="match_parent"
        android:layout_height="wrap_content">
        <com.brioal.rangeseek.view.RangeBar
            android:id="@+id/main_container"
            android:layout_width="match_parent"
            android:layout_height="wrap_content"
            android:layout_centerInParent="true"/>
    </LinearLayout>
2.代码设置
mRangeBar = (RangeBar) findViewById(R.id.main_container);
          //添加数据源
        final List<RangeEntity> list = new ArrayList<>();
        //要显示的文字和实际的值,分别是String 和 Object类型
        list.add(new RangeEntity("15℃", 15));
        list.add(new RangeEntity("18℃", 18));
        list.add(new RangeEntity("21℃", 21));
        list.add(new RangeEntity("24℃", 24));
        list.add(new RangeEntity("27℃", 27));
        list.add(new RangeEntity("30℃", 30));
        //设置数据源
        mRangeBar.setValues(list);
        //添加范围改变监听器
        mRangeBar.addOnRangeChangedListener(new OnRangeChangedListener() {
            @Override
            public void selected(int startIndex, int endIndex) {
            //获取到的是起始和终止的数据在List中所对应的下标
                mTvMin.setText(list.get(startIndex).getValue() + "");
                mTvMax.setText(list.get(endIndex).getValue() + "");
            }
        });
3.提供的供自定义视图的方法
| 方法 | 功能 |
|---|---|
| void addOnRangeChangedListener(OnRangeChangedListener listener) | 设置事件监听器 |
| void setLineColor(int lineColor) | 设置中间的线条颜色 |
| void setLineWidth(int lineWidth) | 设置中间的线条宽度 |
| void setCircleColor(int circleColor) | 设置圆点的边框颜色 |
| void setCircleRadius(int circleRadius) | 设置圆点的半径 |
| void setCircleWidth(int circleWidth) | 设置圆点的线条宽度 |
| void setCenterColor(int centerColor) | 设置选中的圆点的填充颜色 |
| void setPointColor(int pointColor) | 设置游标的填充颜色 |
| void setStartIndex(int startIndex) | 设置选中的起始下标 |
| int getStartIndex() | 获取选中的起始下标 |
| void setEndIndex(int endIndex) | 设置终止下标 |
| int getEndIndex() | 获取终止的下标 |