1、UIGestureRecognizer介绍
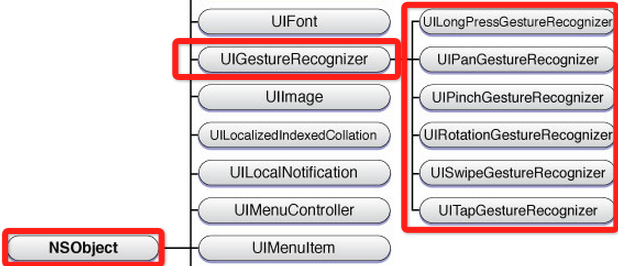
做iOS开发,如果要做出复杂炫丽的效果就必须学好手势。手势识别在iOS上非常重要,手势操作移动设备的重要特征,极大的增加了移动设备使用便捷性。 iOS系统在3.2以后,为方便开发这使用一些常用的手势,提供了UIGestureRecognizer类。手势识别UIGestureRecognizer类是个抽象类,下面的子类是具体的手势,开发这可以直接使用这些手势识别。
2、使用手势的步骤
使用手势很简单,分为两步: 创建手势实例。当创建手势时,指定一个回调方法,当手势开始,改变、或结束时,回调方法被调用。 添加到需要识别的View中。每个手势只对应一个View,当屏幕触摸在View的边界内时,如果手势和预定的一样,那就会回调方法。 ps:一个手势只能对应一个View,但是一个View可以有多个手势。 建议在真机上运行这些手势,模拟器操作不太方便,可能导致你认为手势失效。
3、Pan 拖动手势:
新建一个ImageView,然后添加手势 回调方法:
4、Pinch缩放手势
5、Rotation旋转手势
添加了这几个手势后,运行看效果,程序中的imageView放了一个
6、添加第二个ImagView并添加手势
记住:一个手势只能添加到一个View,两个View当然要有两个手势的实例了
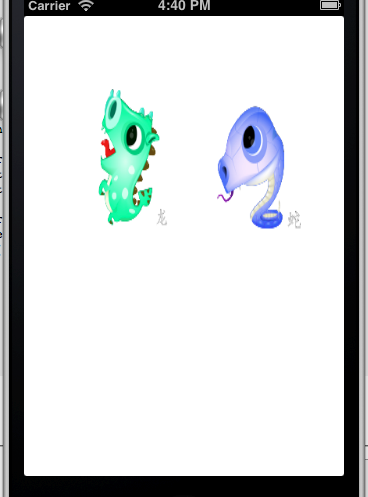
多添加了一条龙的view,两个view都能接收上面的三种手势。运行效果如下:
如何实现呢? 监视手势是否结束 监视触摸的速度
代码实现解析: 计算速度向量的长度(估计大部分都忘了)这些知识了。 如果速度向量小于200,那就会得到一个小于的小数,那么滑行会很短 基于速度和速度因素计算一个终点 确保终点不会跑出父View的边界 使用UIView动画使view滑动到终点 运行后,快速拖动图像view放开会看到view还会在原来的方向滑行一段路。
8、同时触发两个view的手势
手势之间是互斥的,如果你想同时触发蛇和龙的view,那么需要实现协议
9、tap点击手势
这里为了方便看到tap的效果,当点击一下屏幕时,播放一个声音。
为了播放声音,我们加入AVFoundation.framework这个框架。
我会在最后例子代码给出完整代码,添加手势的步骤和前面一样的。
运行,点一下某个图,就会播放一个咬东西的声音。
不过这个点击播放声音有点缺陷,就是在慢慢拖动的时候也会播放。这使得两个手势重合了。怎么解决呢?使用手势的:requireGestureRecognizerToFail方法。
10、手势的依赖性
在viewDidLoad的循环里添加这段代码:
意思就是,当如果pan手势失败,就是没发生拖动,才会出发tap手势。这样如果你有轻微的拖动,那就是pan手势发生了。tap的声音就不会发出来了。
11、自定义手势 自定义手势继承:UIGestureRecognizer,实现下面的方法:
新建一个类,继承UIGestureRecognizer,代码如下:
.h文件
.m文件
调用自定义手势和上面一样,回到这样写:
手势成功后播放呵呵笑的声音。 在真机上运行,按住某个view,快速左右拖动,就会发出笑的声音了。
代码解析: 先获取起始坐标:curTickleStart 通过和ticklePoint的x值对比,得出当前的放下是向左还是向右。再算出移动的x的值是否比MOVE_AMT_PER_TICKLE距离大,如果太则返回。 再判断是否有三次是不同方向的动作,如果是则手势结束,回调。
做iOS开发,如果要做出复杂炫丽的效果就必须学好手势。手势识别在iOS上非常重要,手势操作移动设备的重要特征,极大的增加了移动设备使用便捷性。 iOS系统在3.2以后,为方便开发这使用一些常用的手势,提供了UIGestureRecognizer类。手势识别UIGestureRecognizer类是个抽象类,下面的子类是具体的手势,开发这可以直接使用这些手势识别。
- UITapGestureRecognizer
- UIPinchGestureRecognizer
- UIRotationGestureRecognizer
- UISwipeGestureRecognizer
- UIPanGestureRecognizer
- UILongPressGestureRecognizer
- Tap(点一下)
- Pinch(二指往內或往外拨动,平时经常用到的缩放)
- Rotation(旋转)
- Swipe(滑动,快速移动)
- Pan (拖移,慢速移动)
- LongPress(长按)

2、使用手势的步骤
使用手势很简单,分为两步: 创建手势实例。当创建手势时,指定一个回调方法,当手势开始,改变、或结束时,回调方法被调用。 添加到需要识别的View中。每个手势只对应一个View,当屏幕触摸在View的边界内时,如果手势和预定的一样,那就会回调方法。 ps:一个手势只能对应一个View,但是一个View可以有多个手势。 建议在真机上运行这些手势,模拟器操作不太方便,可能导致你认为手势失效。
3、Pan 拖动手势:
UIImageView *snakeImageView = [[UIImageView alloc] initWithImage:[UIImage imageNamed:@"snake.png"]];
    snakeImageView.frame = CGRectMake(50, 50, 100, 160);
    UIPanGestureRecognizer *panGestureRecognizer = [[UIPanGestureRecognizer alloc]
                                                    initWithTarget:self
                                                    action:@selector(handlePan:)];
    [snakeImageView addGestureRecognizer:panGestureRecognizer];
    [self.view setBackgroundColor:[UIColor whiteColor]];
    [self.view addSubview:snakeImageView];
新建一个ImageView,然后添加手势 回调方法:
- (void) handlePan:(UIPanGestureRecognizer*) recognizer
{
    CGPoint translation = [recognizer translationInView:self.view];
    recognizer.view.center = CGPointMake(recognizer.view.center.x + translation.x,
                                   recognizer.view.center.y + translation.y);
    [recognizer setTranslation:CGPointZero inView:self.view];

}
4、Pinch缩放手势
UIPinchGestureRecognizer *pinchGestureRecognizer = [[UIPinchGestureRecognizer alloc]
                                                        initWithTarget:self
                                                        action:@selector(handlePinch:)];
[snakeImageView addGestureRecognizer:pinchGestureRecognizer];

- (void) handlePinch:(UIPinchGestureRecognizer*) recognizer
{
    recognizer.view.transform = CGAffineTransformScale(recognizer.view.transform, recognizer.scale, recognizer.scale);
    recognizer.scale = 1;
}
5、Rotation旋转手势
UIRotationGestureRecognizer *rotateRecognizer = [[UIRotationGestureRecognizer alloc]
                                                     initWithTarget:self
                                                     action:@selector(handleRotate:)];
    [snakeImageView addGestureRecognizer:rotateRecognizer];

- (void) handleRotate:(UIRotationGestureRecognizer*) recognizer
{
    recognizer.view.transform = CGAffineTransformRotate(recognizer.view.transform, recognizer.rotation);
    recognizer.rotation = 0;
}
添加了这几个手势后,运行看效果,程序中的imageView放了一个
/^\/^\
_|__| O|
\/ /~ \_/ \
\____|__________/ \
\_______ \
`\ \ \
| | \
/ / \
/ / \\
/ / \ \
/ / \ \
/ / _----_ \ \
/ / _-~ ~-_ | |
( ( _-~ _--_ ~-_ _/ |
\ ~-____-~ _-~ ~-_ ~-_-~ /
~-_ _-~ ~-_ _-~
~--______-~ ~-___-~
的图片,在模拟器上拖动是没问题的。缩放和旋转有点问题,估计是因为在模拟器上的模拟的两个接触点距离在imageView的边界外了,所以操作无效果。 建议在真机上运行这个手势。 在模拟器上缩放和选择的操作技巧: 可以把imageView的frame值设置大一点,按住alt键,按下触摸板(不按下不行),这样就可以旋转和缩放了。6、添加第二个ImagView并添加手势
记住:一个手势只能添加到一个View,两个View当然要有两个手势的实例了
- (void)viewDidLoad
{
    [super viewDidLoad];
    UIImageView *snakeImageView = [[UIImageView alloc] initWithImage:[UIImage imageNamed:@"snake.png"]];
    UIImageView *dragonImageView = [[UIImageView alloc] initWithImage:[UIImage imageNamed:@"dragon.png"]];
    snakeImageView.frame = CGRectMake(120, 120, 100, 160);
    dragonImageView.frame = CGRectMake(50, 50, 100, 160);
    [self.view addSubview:snakeImageView];
    [self.view addSubview:dragonImageView];

    for (UIView *view in self.view.subviews) {
        UIPanGestureRecognizer *panGestureRecognizer = [[UIPanGestureRecognizer alloc]
                                                        initWithTarget:self
                                                        action:@selector(handlePan:)];

        UIPinchGestureRecognizer *pinchGestureRecognizer = [[UIPinchGestureRecognizer alloc]
                                                            initWithTarget:self
                                                            action:@selector(handlePinch:)];

        UIRotationGestureRecognizer *rotateRecognizer = [[UIRotationGestureRecognizer alloc]
                                                         initWithTarget:self
                                                         action:@selector(handleRotate:)];

        [view addGestureRecognizer:panGestureRecognizer];
        [view addGestureRecognizer:pinchGestureRecognizer];
        [view addGestureRecognizer:rotateRecognizer];
        [view setUserInteractionEnabled:YES];
    }
    [self.view setBackgroundColor:[UIColor whiteColor]];
}
多添加了一条龙的view,两个view都能接收上面的三种手势。运行效果如下:

如何实现呢? 监视手势是否结束 监视触摸的速度
- (void) handlePan:(UIPanGestureRecognizer*) recognizer
{
    CGPoint translation = [recognizer translationInView:self.view];
    recognizer.view.center = CGPointMake(recognizer.view.center.x + translation.x,
                                       recognizer.view.center.y + translation.y);
    [recognizer setTranslation:CGPointZero inView:self.view];

    if (recognizer.state == UIGestureRecognizerStateEnded) {

        CGPoint velocity = [recognizer velocityInView:self.view];
        CGFloat magnitude = sqrtf((velocity.x * velocity.x) + (velocity.y * velocity.y));
        CGFloat slideMult = magnitude / 200;
        NSLog(@"magnitude: %f, slideMult: %f", magnitude, slideMult);

        float slideFactor = 0.1 * slideMult; // Increase for more of a slide
        CGPoint finalPoint = CGPointMake(recognizer.view.center.x + (velocity.x * slideFactor),
                                         recognizer.view.center.y + (velocity.y * slideFactor));
        finalPoint.x = MIN(MAX(finalPoint.x, 0), self.view.bounds.size.width);
        finalPoint.y = MIN(MAX(finalPoint.y, 0), self.view.bounds.size.height);

        [UIView animateWithDuration:slideFactor*2 delay:0 options:UIViewAnimationOptionCurveEaseOut animations:^{
            recognizer.view.center = finalPoint;
        } completion:nil];

    }
代码实现解析: 计算速度向量的长度(估计大部分都忘了)这些知识了。 如果速度向量小于200,那就会得到一个小于的小数,那么滑行会很短 基于速度和速度因素计算一个终点 确保终点不会跑出父View的边界 使用UIView动画使view滑动到终点 运行后,快速拖动图像view放开会看到view还会在原来的方向滑行一段路。
8、同时触发两个view的手势
手势之间是互斥的,如果你想同时触发蛇和龙的view,那么需要实现协议
UIGestureRecognizerDelegate, @interface ViewController : UIViewController@end //并在协议这个方法里返回YES。 -(BOOL)gestureRecognizer:(UIGestureRecognizer *)gestureRecognizer shouldRecognizeSimultaneouslyWithGestureRecognizer:(UIGestureRecognizer *)otherGestureRecognizer { return YES; } //把self作为代理设置给手势: panGestureRecognizer.delegate = self; pinchGestureRecognizer.delegate = self; rotateRecognizer.delegate = self; //这样可以同时拖动或旋转缩放两个view了。
9、tap点击手势
这里为了方便看到tap的效果,当点击一下屏幕时,播放一个声音。
为了播放声音,我们加入AVFoundation.framework这个框架。
- (AVAudioPlayer *)loadWav:(NSString *)filename {
    NSURL * url = [[NSBundle mainBundle] URLForResource:filename withExtension:@"wav"];
    NSError * error;
    AVAudioPlayer * player = [[AVAudioPlayer alloc] initWithContentsOfURL:url error:&error];
    if (!player) {
        NSLog(@"Error loading %@: %@", url, error.localizedDescription);
    } else {
        [player prepareToPlay];
    }
    return player;
}
我会在最后例子代码给出完整代码,添加手势的步骤和前面一样的。
#import#import @interface ViewController : UIViewController @property (strong) AVAudioPlayer * chompPlayer; @property (strong) AVAudioPlayer * hehePlayer; @end - (void)handleTap:(UITapGestureRecognizer *)recognizer { [self.chompPlayer play]; }
运行,点一下某个图,就会播放一个咬东西的声音。
不过这个点击播放声音有点缺陷,就是在慢慢拖动的时候也会播放。这使得两个手势重合了。怎么解决呢?使用手势的:requireGestureRecognizerToFail方法。
10、手势的依赖性
在viewDidLoad的循环里添加这段代码:
[tapRecognizer requireGestureRecognizerToFail:panGestureRecognizer];
意思就是,当如果pan手势失败,就是没发生拖动,才会出发tap手势。这样如果你有轻微的拖动,那就是pan手势发生了。tap的声音就不会发出来了。
11、自定义手势 自定义手势继承:UIGestureRecognizer,实现下面的方法:
– touchesBegan:withEvent:
– touchesMoved:withEvent:
– touchesEnded:withEvent:
- touchesCancelled:withEvent:
新建一个类,继承UIGestureRecognizer,代码如下:
.h文件
#importtypedef enum { DirectionUnknown = 0, DirectionLeft, DirectionRight } Direction; @interface HappyGestureRecognizer : UIGestureRecognizer @property (assign) int tickleCount; @property (assign) CGPoint curTickleStart; @property (assign) Direction lastDirection; @end
.m文件
#import "HappyGestureRecognizer.h" #import#define REQUIRED_TICKLES 2 #define MOVE_AMT_PER_TICKLE 25 @implementation HappyGestureRecognizer - (void)touchesBegan:(NSSet *)touches withEvent:(UIEvent *)event { UITouch * touch = [touches anyObject]; self.curTickleStart = [touch locationInView:self.view]; } - (void)touchesMoved:(NSSet *)touches withEvent:(UIEvent *)event { // Make sure we've moved a minimum amount since curTickleStart UITouch * touch = [touches anyObject]; CGPoint ticklePoint = [touch locationInView:self.view]; CGFloat moveAmt = ticklePoint.x - self.curTickleStart.x; Direction curDirection; if (moveAmt < 0) { curDirection = DirectionLeft; } else { curDirection = DirectionRight; } if (ABS(moveAmt) < MOVE_AMT_PER_TICKLE) return; // 确认方向改变了 if (self.lastDirection == DirectionUnknown || (self.lastDirection == DirectionLeft && curDirection == DirectionRight) || (self.lastDirection == DirectionRight && curDirection == DirectionLeft)) { // 挠痒次数 self.tickleCount++; self.curTickleStart = ticklePoint; self.lastDirection = curDirection; // 一旦挠痒次数超过指定数,设置手势为结束状态 // 这样回调函数会被调用。 if (self.state == UIGestureRecognizerStatePossible && self.tickleCount > REQUIRED_TICKLES) { [self setState:UIGestureRecognizerStateEnded]; } } } - (void)reset { self.tickleCount = 0; self.curTickleStart = CGPointZero; self.lastDirection = DirectionUnknown; if (self.state == UIGestureRecognizerStatePossible) { [self setState:UIGestureRecognizerStateFailed]; } } - (void)touchesEnded:(NSSet *)touches withEvent:(UIEvent *)event { [self reset]; } - (void)touchesCancelled:(NSSet *)touches withEvent:(UIEvent *)event { [self reset]; } @end
调用自定义手势和上面一样,回到这样写:
- (void)handleHappy:(HappyGestureRecognizer *)recognizer{
    [self.hehePlayer play];
}
手势成功后播放呵呵笑的声音。 在真机上运行,按住某个view,快速左右拖动,就会发出笑的声音了。
代码解析: 先获取起始坐标:curTickleStart 通过和ticklePoint的x值对比,得出当前的放下是向左还是向右。再算出移动的x的值是否比MOVE_AMT_PER_TICKLE距离大,如果太则返回。 再判断是否有三次是不同方向的动作,如果是则手势结束,回调。
收藏的用户(0) X
正在加载信息~
推荐阅读
最新回复 (0)
站点信息
- 文章2321
- 用户1336
- 访客12099119
每日一句
Breath forms fleeting poems in the air.
呵出的白气,在空中写下短暂的诗。
呵出的白气,在空中写下短暂的诗。